 Embedded Linux Systems: Using Buildroot for building Embedded
Linux Systems on Raspberry Pi 4 and 3 Model B by Mariano Ruiz is licensed
under a Creative Commons Attribution-ShareAlike 4.0 International
License.
Embedded Linux Systems: Using Buildroot for building Embedded
Linux Systems on Raspberry Pi 4 and 3 Model B by Mariano Ruiz is licensed
under a Creative Commons Attribution-ShareAlike 4.0 International
License.
3. Embedded Linux With RPI
3.1. Document Overview
This document describes the steps to develop an embedded Linux-based system using the Raspberry PI board. The document has been specifically written to use a Raspberry PI development system based on the BCM2837 processor. All the software elements used have a GPL license.
Note
The time necessary to complete all the tutorial steps is approximately 8 hours.
Read all the instructions carefully before executing the practical part; Otherwise, you will find errors, which are probably unpredicted. In parallel, you need to review the slides available at the Moodle site or at [RD1]
3.2. References
Embedded Linux system development. Slides
Mastering Embedded Linux Programming - Second Edition. Packt. https://www.packtpub.com/product/mastering-embedded-linux-programming-second-edition/9781787283282
Raspberry-Pi User Guide. Reference Manual.
www.myraspberry-pi.org/wp-content/…/Raspberry.Pi_.User_.Guide_.pdf
3.3. Building Linux using buildroot
3.3.1. Elements needed for the execution of these LABS
In order to execute this lab properly, you need the following elements:
The VMware player software version 17.6.1 or above. Available at Broadcom website (free download and use but you need to register). This software has already been installed on the laboratory desktop computer.
A VMWare virtual machine with Ubuntu 24.04 and all the software packages installed is already available on the Desktop. This virtual machine is available for your personal use. If you want to set up your virtual machine by yourself, follow the instructions provided in Annex I.
A Raspberry Pi, accessories and a USB cable are available at the laboratory.
Basic knowledge of Linux commands.
3.4. Starting the VMware
Start VMware Player and open the RPI Virtual Machine. Wait until the welcome screen is displayed (see Fig. 3.1 and Fig. 3.2). Login as “ubuntu” user using the password “ubuntu”.
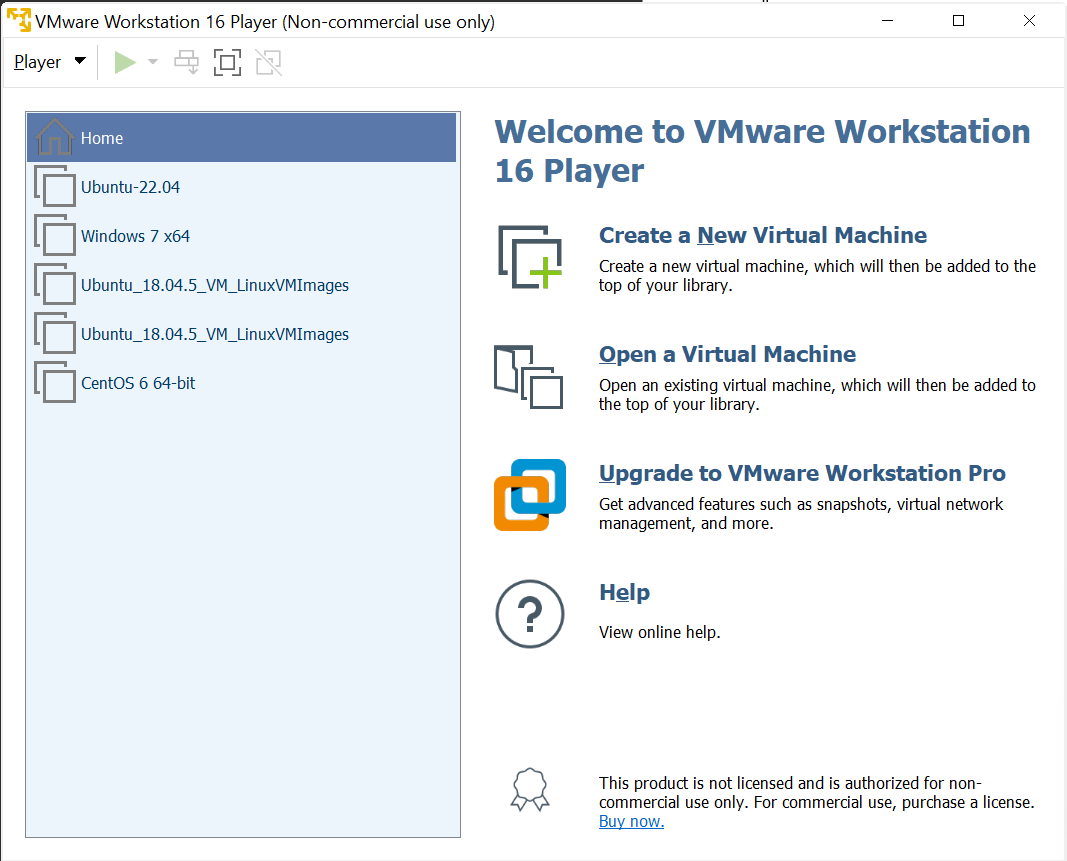
Fig. 3.1 Main screen of VMware player with some VM available to be executed

Fig. 3.2 Ubuntu Virtual Machine login screen.
Open the Firefox web browser and download from https://buildroot.org/, the version identified as buildroot2025.02.9 (use the download link, see Fig. 3.3, and navigate searching for earlier releases if necessary, https://buildroot.org/downloads/ ). Save the file to the Documents folder in your account (Fig. 3.4).
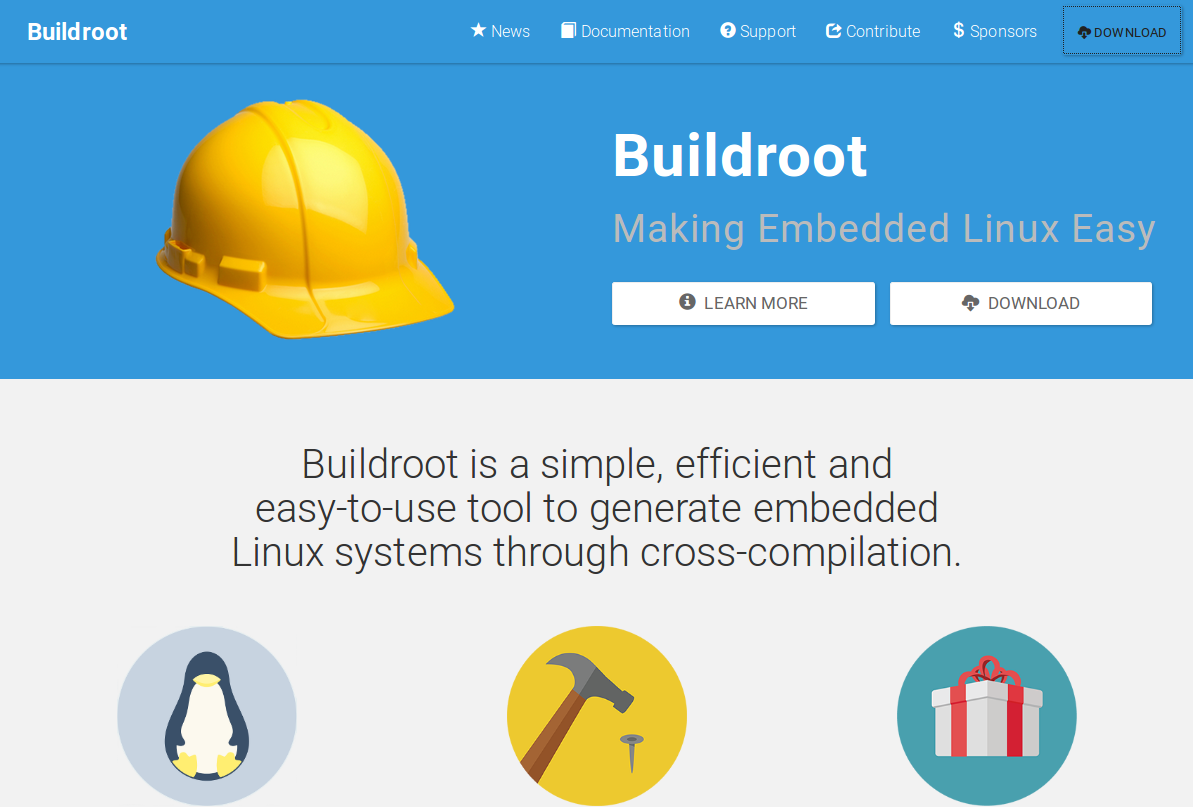
Fig. 3.3 Buildroot home page.
Buildroot is a tool to generate embedded Linux systems in our PC, and then this Linux will be installed in the target.
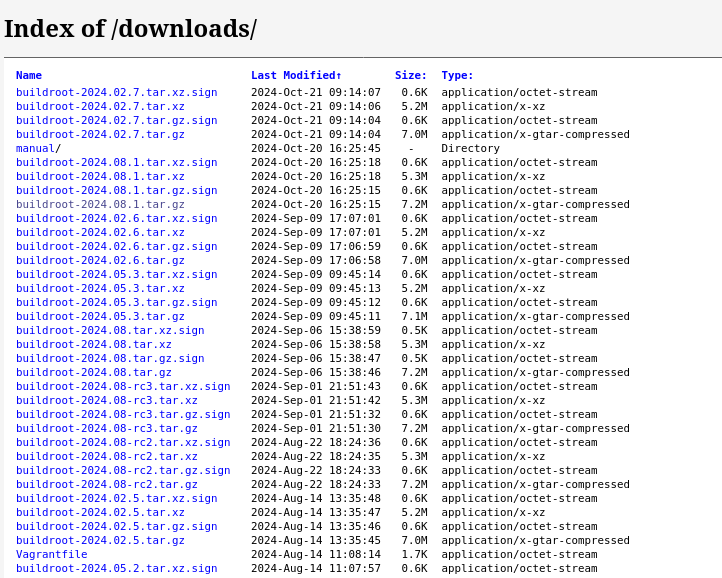
Fig. 3.4 Example of Downloading Buildroot source code.
Create a folder “rpi” in “Documents”. Copy the file to the “Documents/rpi” folder and decompress the file (Fig. 3.5).
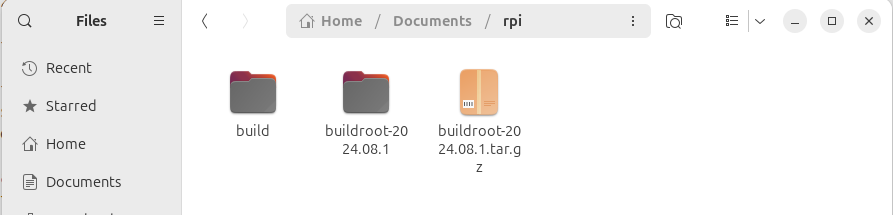
Fig. 3.5 Buildroot folder (the folder name depends on the version downloaded).
Right-click in the window and execute “Open in Terminal” or execute the Terminal application from Dash home as shown in Fig. 3.6 (if “Open in Terminal” is not available, search how to install it in Ubuntu).
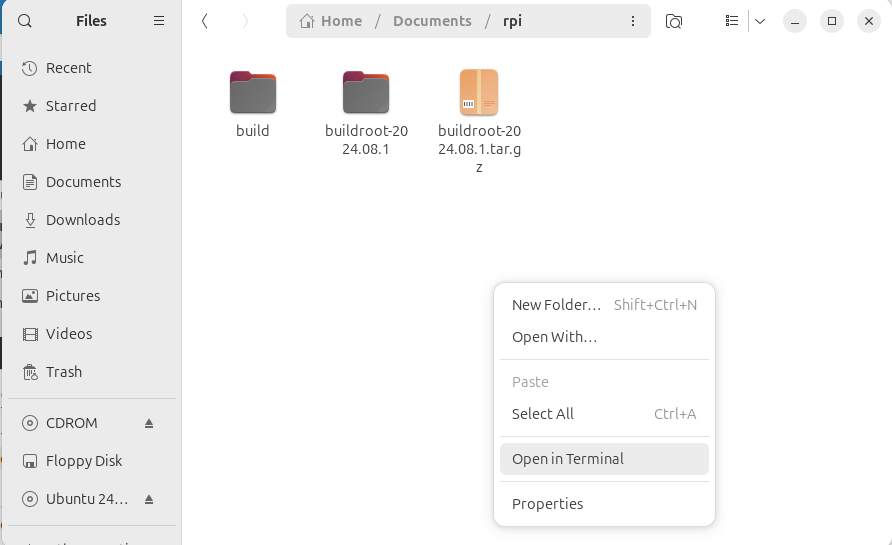
Fig. 3.6 Terminal application
In some seconds, a command window is displayed. Then, execute these commands:
$ mkdir build
$ cd build
$ make O=$PWD -C /home/ubuntu/Documents/rpi/buildroot-2025.02.9/ menuconfig
Important
The build folder will contain all the compilation of the embedded Linux generated. Remember to change to this folder before doing any operation with buildroot
Important
For this course, you will need to become familiar with the Linux Terminal use. On the Moodle site of this course, you can find a cheat sheet with the basic Linux commands.
Tip
In a Linux terminal, the “TAB” key helps you to autocomplete the commands, folders, and file names.
In some seconds, you will see a new window similar to Fig. 3.7.
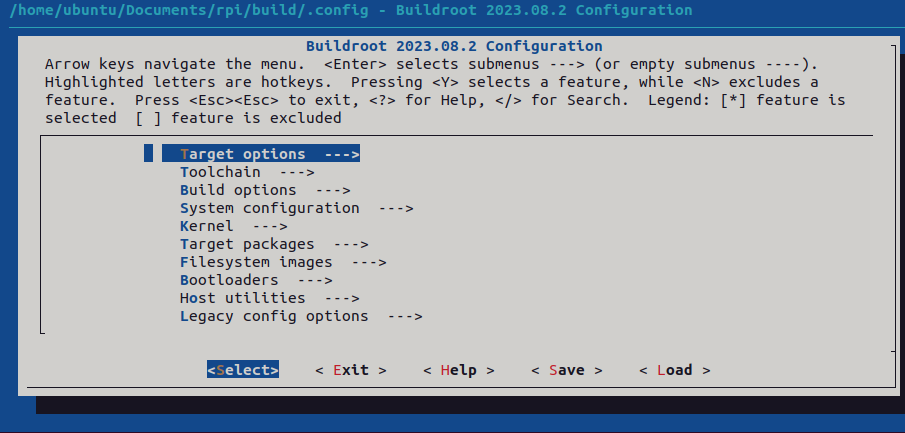
Fig. 3.7 Buildroot setup screen.
3.5. Configuring Buildroot for RPI4
Once the Buildroot configuration is started, it is necessary to configure the different items. You need to navigate the different menus and select the installation elements. Table I contains the specific configuration of Buildroot for installing it in the Raspberry Pi. Depending on the downloaded version, the organization and the items displayed can differ. If an item of buildroot configuration does not appear in the Table I leaves it with its default value.
Important
The Buildroot configuration is an iterative process. In order to set up your embedded Linux system, you will need to execute the configuration several times.
Warning
The tables have three columns. Check that you understand all the content shown.
3.5.1. Target Options
This is the selection of the processor to use (Table 3.1).
Target Architecture |
AArch64 (little endian) |
ARM 64 bits |
Target Architecture Variants. |
Cortex-A72 |
|
Floating Point Strategy |
VFPv4 |
|
MMU Page Size |
4KB |
|
Target Binary Format |
ELF |
3.5.2. Toolchain
Cross Compiler, linker, and libraries to be built to compile our embedded application. Select the options shown in the following table (Table 3.2).
Toolchain type |
Buildroot toolchain |
The Embedded Linux System will be compiled with tools integrated into Buildroot |
Custom toolchain vendor name. |
buildroot |
|
C library |
glibc |
Library containing the typical C libraries used in Linux environments (stdlib, stdio, etc) |
Kernel Headers |
Same as kernel being built |
Include files for kernel |
Kernel Header Options |
6.6.x kernel headers |
|
Binutils Version |
2.43.1 |
Binutils contains tools to manage the binary files obtained in the compilation of the different applications |
GCC compiler Version |
gcc 13.x |
GCC tools version to be installed |
Enable C++ support |
Yes. |
Including support for C++ programming, compiling, and linking. |
Build cross gdb for the host |
Yes. |
Includes the support for GDB. |
Add Python support |
Yes |
|
GDB debugger version |
gdb 15.x |
3.5.3. Build options
How Buildroot will build the code. Leave the default values.
3.5.4. System Configuration
Here you can define the basic configuration of the embedded Linux to generate and specific scripts to add additional functionality ( Table 3.3).
Root FS skeleton |
Default target skeleton. |
Linux folder filesystem organization for skeleton the embedded system |
System hostname |
buildroot |
Name of the embedded system |
System Banner |
Linux RPI 4 |
Banner. |
Passwords encoding |
sha 256 |
|
Init System |
Busybox |
|
/dev management |
Dynamic using devtmpfs + mdev |
|
Path to permissions for table |
system/device_table.txt |
|
Enable root login with password |
yes |
|
Root password |
rpi |
|
Busybox’ default shell |
/bin/sh |
|
Run a getty after boot |
tty PORT: console. Baudrate: keep kernel default. TERM environment variable: vt100 |
|
remount root filesystem read write during boot |
Yes |
|
Network interface to configure through DHCP |
eth0 |
|
Set the system’s default PATH |
/bin:/sbin:/usr/bin:/usr/sbin |
|
Purge unwanted locales |
yes |
|
Leave the default values for all others |
||
Custom scripts to run path before creating filesystem images |
your path/buildroot-2025.02.9/board/raspberrypi4-64/post-build.sh |
your path -> “/home/….” os where you have decompressed buildroot |
Custom scripts to run inside the fakeroot environment |
||
Custom scripts to run after creating filesystem images |
your path/buildroot-2025.02.9/board/raspberrypi4-64/post-image.sh |
3.5.5. Linux Kernel
This is the configuration of the Linux kernel. The specific location and version is specified among other parameters (Table 3.4). See third column for details of git repo to use.
Kernel Version |
Custom tarball. |
$(call github,raspberrypi,linux,576cc10e1ed50a9eacffc7a05c796051d7343ea4)/linux-576cc10e1ed50a9eacffc7a05c796051d7343ea4.tar.gz |
Kernel configuration |
Using and intree defconfig file |
|
Defconfigname |
bcm2711 |
This file contains the specific configuration of the kernel for the RPI |
Kernel binary format |
Image |
|
Kernel compression format |
gzip compression |
|
Build a Device Tree Blob (DTB) |
Yes |
|
Intree Device Tree Source file name |
broadcom/bcm2711-rpi-4-b broadcom/bcm2711-rpi-400 broadcom/bcm2711-rpi-cm4 broadcom/bcm2711-rpi-cm4s |
|
Need host OpenSSL |
Yes |
|
Linux kernel Extensions |
Nothing |
|
Linux Kernel Tools |
Nothing |
3.5.6. Target Packages
Target packages option allows to select the software elements that will be installed in the filesystem of the embedded Linux. Additionally, this option installs the busybox package that contains the basic Linux commands (Table 3.5). Buildroot creates the filesystem hierarchy following the Linux standard organization.
Busybox |
yes |
|
Busybox configuration file to use |
package/busybox/busybox.config |
|
Show packages that are also provided by busybox |
Yes |
|
Audio and video applications |
Default values |
|
Compresssors and decompressors |
xz-utils |
|
Debugging, profiling and benchmark |
gdb, gdbserver, full debugger |
|
Developments tools |
Default values |
|
Filesystem and flash utilities |
Default values |
|
Games |
Default values |
|
Graphic libraries and applications (graphic/text) |
Default values |
|
Hardware handling |
Firmware>rpifirmware rpi4 (default) |
Path to a file stores as boot/config.txt: your path/board/raspberrypi4-64/config_4_64bit.txt |
Hardware handling |
Firmware>rpifirmware |
Path to a file stored as boot/cmdline.txt: your path/board/raspberrypi4-64/cmdline.txt |
Hardware handling |
Firmware>rpifirmware |
install DTB overlays |
Interpreters language and scripting Libraries |
Python3 |
|
Miscellaneous |
Default Values |
|
Libraries |
Default Values |
|
Networking applications |
ifupdown scripts, openssh |
|
Package Managers |
Default values |
|
Real Time, Shell and utilities |
Default Values |
|
System Tools |
kmod, kmod utilities |
|
Text Editor and Viewers |
Default Values |
3.5.7. File System Images
This option selects the format of the root filesystem and the size (Table 3.6).
ext2/3/4 root filesystem |
ext4 |
|
filesystem label |
rootfs |
|
exact size |
400M Leave the other default values |
Update this value with your specific needs |
Compression method |
No compression |
3.5.8. Boot-loaders
The Raspberry PI does not need an specific bootloader because it is incorporated in the firmware provided by Broadcom.
3.5.9. Host Utilities
Additional tools needed for ubuntu to create all the embedded images (Table 3.7).
host environment setup |
Yes |
|
host genimage |
Yes |
|
host dosfstools |
Yes |
|
host kmod |
Yes, support xz-compressed modules |
|
host mtools |
Yes |
Once you have configured all the menus, you need to exit, saving the values (File->Quit).
3.6. Compiling buildroot
In the Terminal Window execute the following command (Listing 3.1):
$ make O=$PWD -C /home/ubuntu/Documents/rpi/buildroot-2025.02.9/
If everything is correct, you will see a final window similar to the one represented in Fig. 3.8.
Warning
In this step, buildroot will connect, using the internet, to different repositories. After downloading the code, Buildroot will compile the applications and generate a lot of files and folders. Depending on your internet speed access and the configuration chosen, this step could take up to two hours. If you have errors in the buildroot configuration, you could obtain errors in this compilation phase. Check your configuration correctly. Use “make O=$PWD -C /home/ubuntu/Documents/rpi/buildroot-2025.02.9/ clean” to clean up your partial compilation.
Note
dl subfolder in your buildroot folder contains all the packages downloaded for the internet. If you want to move your buildroot configuration from one computer to another, avoiding the copy of the virtual machine, you can copy this folder. |
Warning
If your building process fails different reasons could be the origin. consider to use the following actions. Make a copy of your .config file (hidden file in Linux) to save your configuration.
make O=$PWD -C /home/ubuntu/Documents/rpi/buildroot-2025.02.9/ clean |
Build again buildroot |
make O=$PWD -C /home/ubuntu/Documents/rpi/buildroot-2025.02.9/ distclean |
configure and build again buildroot |
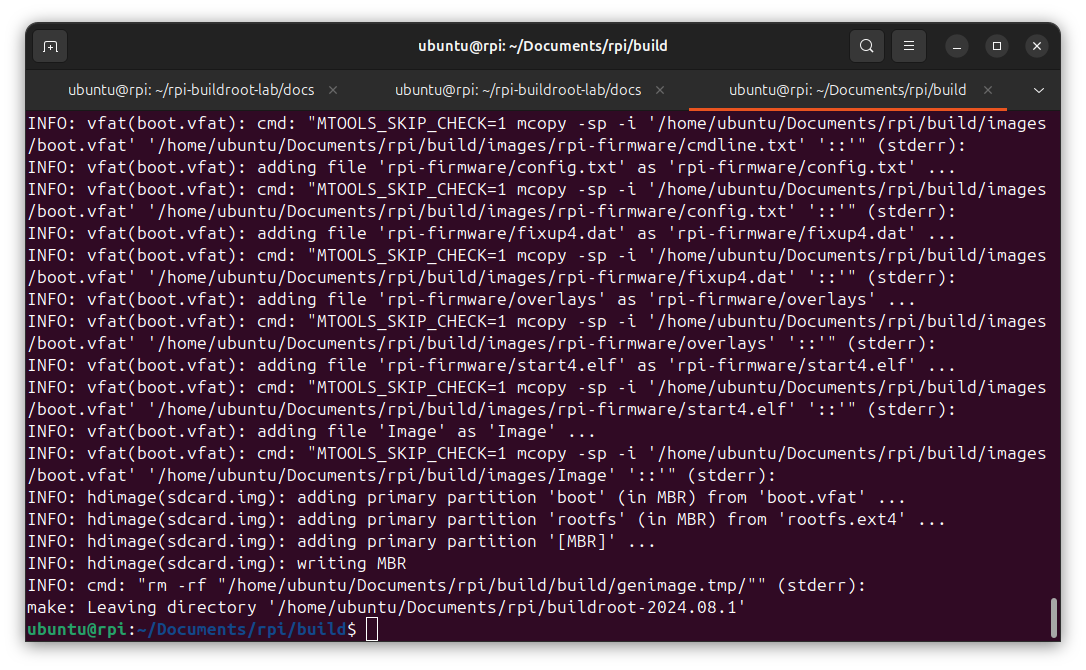
Fig. 3.8 Successful compilation and installation of Buildroot
Buildroot has generated some folders with different files and subfolders containing the tools for generating your Embedded Linux System. The next paragraph explains the main outputs obtained.
3.7. Buildroot Output.
The main output files of the execution of the previous steps can be located in the folder “build/images”. Fig. 3.9 summarizes the use of Buildroot. Buildroot generates a bootloader, a kernel image, and a file system.
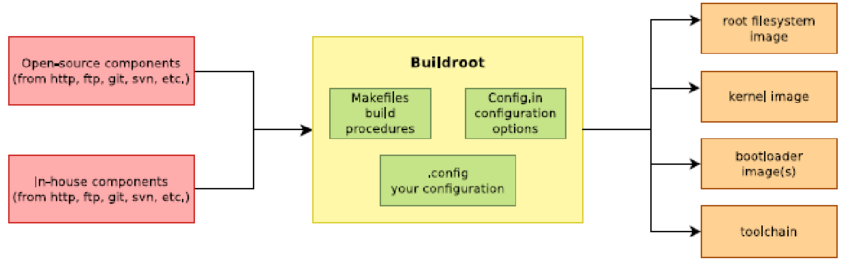
Fig. 3.9 Schematic representation of the Buildroot tool. Buildroot generates the root file system, the kernel image, the bootloader, and the toolchain. Figure copied from “Bootlin” training materials (http://bootlin.com/training/)
In our specific case, the folder content is shown in Fig. 3.10
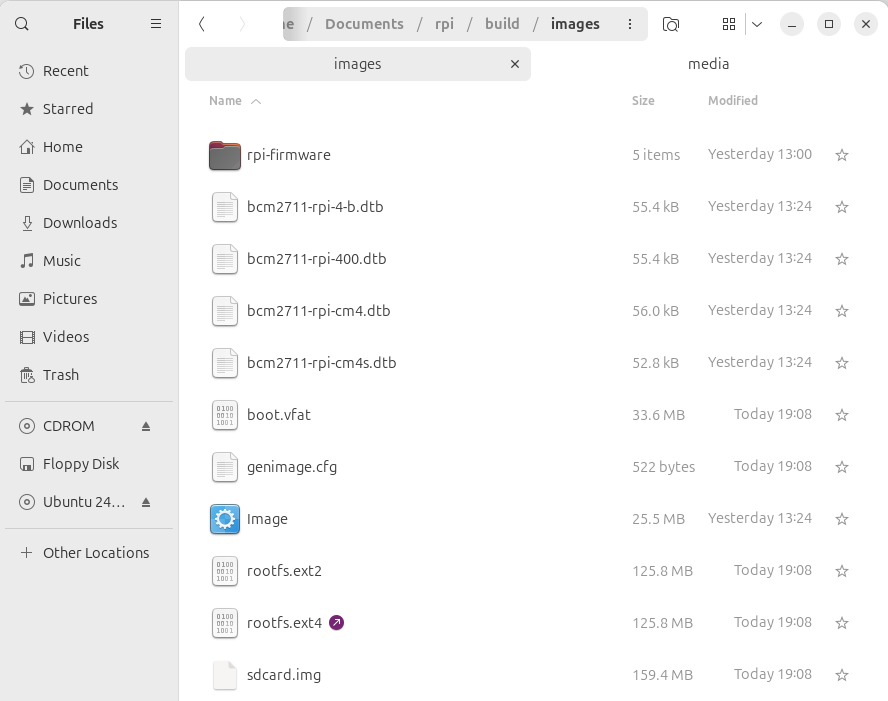
Fig. 3.10 The images folder contains the binary files for our embedded system.
Copy the sdcard.img file to your SDcard using this Linux command in the Buildroot folder (sdb is typically the device assigned to the sdcard, unless you have other removable devices connected to the system):
$ sudo dd if=./images/sdcard.img of=/dev/sd<x> bs=10M
Warning
<x> is the identification used by Linux for your microSD card, tipically “b” or “c”. Never use “a” because this is the operating system hardisk
Remember to format again the microSDcard if you need to repeat this process otherwise you will have errors when Linux is booting.
See also
Linux gparted is an excellent tool for partitioning and formatting the SD card.
3.8. Booting the Raspberry Pi.
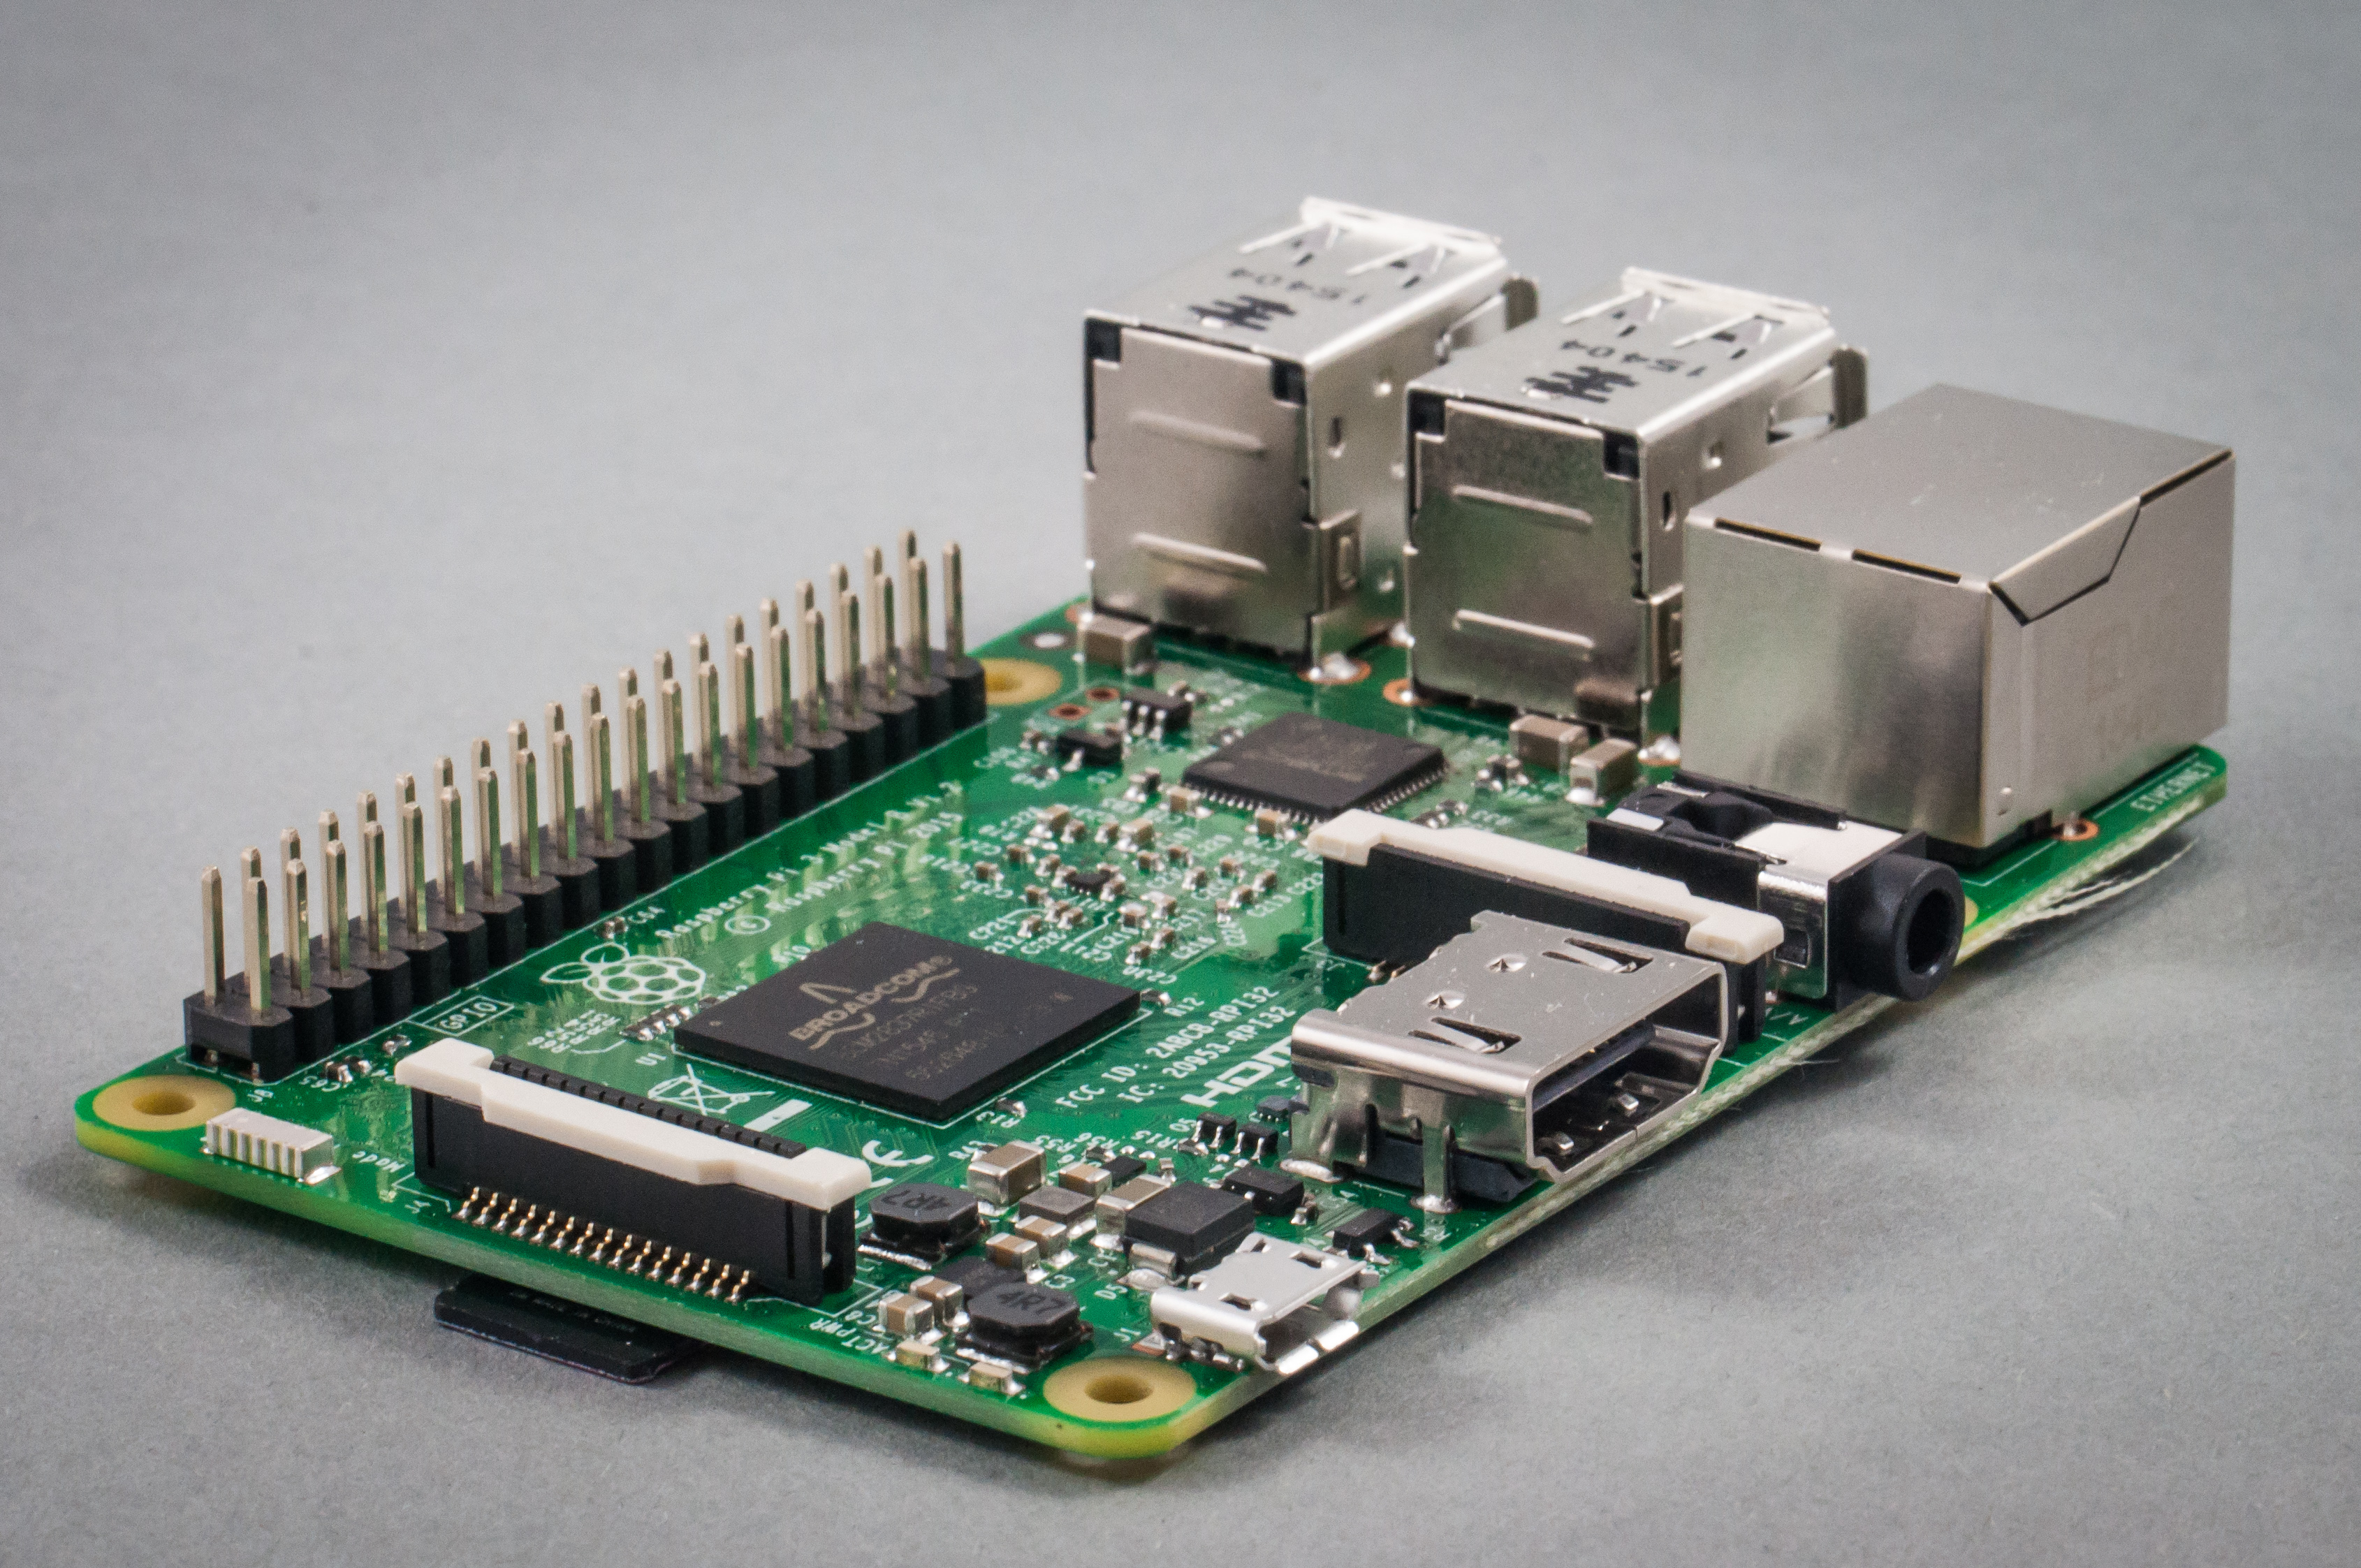
Fig. 3.11 displays a Raspberry Pi. The description of this card, its functionalities, interfaces, and connectors are explained in the ref [RD2]. The fundamental connection requires:
To connect a USB to RS232 adapter (provided) to the raspberry-pi expansion header (see Fig. 3.12, and Fig. 3.13). This adapter provides the serial line interface as a console in the Linux host operating system.
To connect the power supply with the micro-USB connector provided (5 v).
To connect the Ethernet cable to the RJ45 port if it is available (at home, not the case of UPM’s Lab).

Fig. 3.11 RaspBerry-Pi 4 Model B hardware with main elements identified
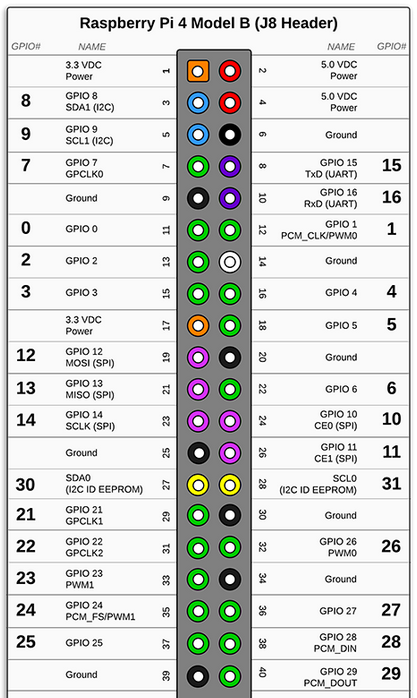
Fig. 3.12 Raspberry-PI 4 header terminal identification.
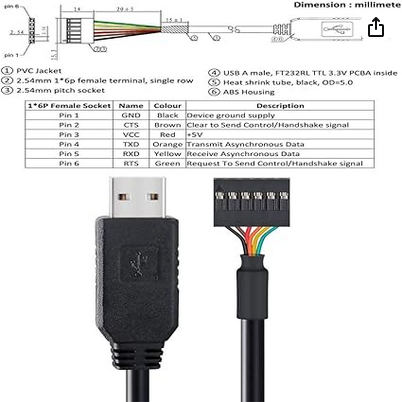
Fig. 3.13 Identification of the terminals in the USB-RS232 adapter
RPI connector |
FDTI Terminal |
|---|---|
RXD UART (GPIO16) Pin 10 |
Terminal 4 (Orange) |
TXD UART (GPIO15) Pin 8 |
Terminal 5 (Yellow) |
Ground (GND) Pin 6 |
Pin 1 |
The booting process of the Raspberry Pi BCM2711 processor is depicted in Fig. 3.14. Take into account that this System On Chip (SoC), the BCM2711, contains two different processors: a GPU and an ARM CPU. The programs bootcode.bin and start.elf are written explicitly for the GPU, and the source code is unavailable. Broadcom only provides details of this to customers who sign a commercial agreement. The last executable (start.elf) boots the ARM processor and allows the execution of ARM programs such as Linux OS kernel or other binaries such as u-boot bootloader.

Fig. 3.14 Booting process for BCM2711 processor in the raspberry-pi.
The config.txt file contains essential information to boot the Linux OS and perform the configuration of different hardware elements (look at http://elinux.org/RPiconfig and check the meaning of the different configuration parameters). Verify the content of the config.txt file generated by buildroot and complete it as depicted below ( Listing 3.2 ).
# Please note that this is only a sample, we recommend you to change it to fit
# your needs.# You should override this file using BR2_PACKAGE_RPI_FIRMWARE_CONFIG_FILE.
# See http://buildroot.org/manual.html#rootfs-custom
# and http://elinux.org/RPiconfig for a description of config.txt syntax

start_file=start4.elf
fixup_file=fixup4.dat

kernel=**Image**

# To use an external initramfs file
#initramfs rootfs.cpio.gz
# Disable overscan assuming the display supports displaying the full resolution
# If the text shown on the screen disappears off the edge, comment this out

disable_overscan=1

# How much memory in MB to assign to the GPU on Pi models having
# 256, 512 or 1024 MB total memory
gpu_mem_256=100
gpu_mem_512=100
gpu_mem_1024=100

# Enable UART0 for serial console on ttyAMA0
dtoverlay=miniuart-bt

# enable autoprobing of Bluetooth driver without need of hciattach/btattach
dtparam=krnbt=on
In this example, once the ARM is released from reset, it executes the Image application. This binary application is the Linux Kernel in Image format. The parameters passed to the application specified in the kernel=<….> are detailed in the cmdline.txt file. For instance, by default, Buildroot generates this one (Listing 3.3):
root=/dev/mmcblk0p2 rootwait console=tty1 console=ttyAMA0,115200
In the Linux machine, open a Terminal and execute the program sudo putty with sudo rights (sudo putty), in a second a window appears. Configure the parameters using the information displayed in Fig. 3.15 (for the specific case of putty), and then press “Open”. Apply the power to the Raspberry PI, and you will see the booting messages.
Tip
[Serial interface identification in Linux]: In Linux the serial devices are identified typically with the names /dev/ttyS0, /dev/ttyS1, etc. In the figure, the example has been checked with a serial port implemented with a USB-RS232 converter. This is the reason why the name is /dev/ttyUSB0. In your computer, you need to find the identification of your serial port. Use Linux dmesg command to do this.
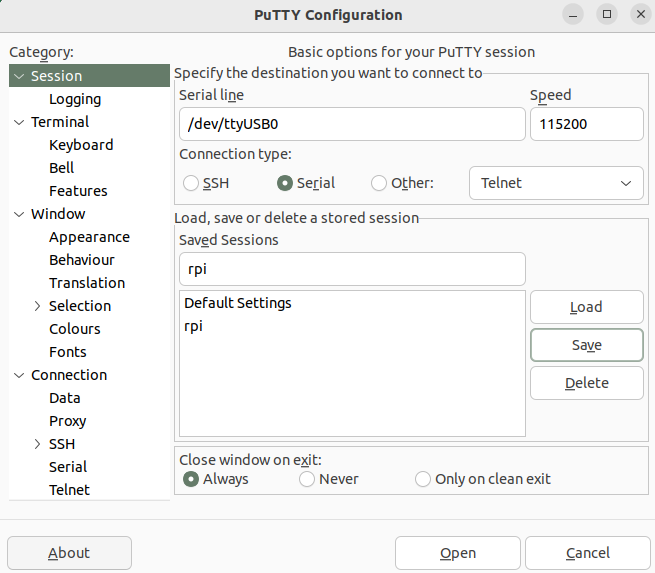
Fig. 3.15 Putty program main window.
After a few seconds, you will see a lot of messages displayed on the terminal. Linux kernel is booting, and the operating system is running its configuration and initial daemons. If the system boots correctly, you will see an output like the one represented in Fig. 3.16. Introduce the username root (password in case you have configured it), and the Linux shell will be available for you.
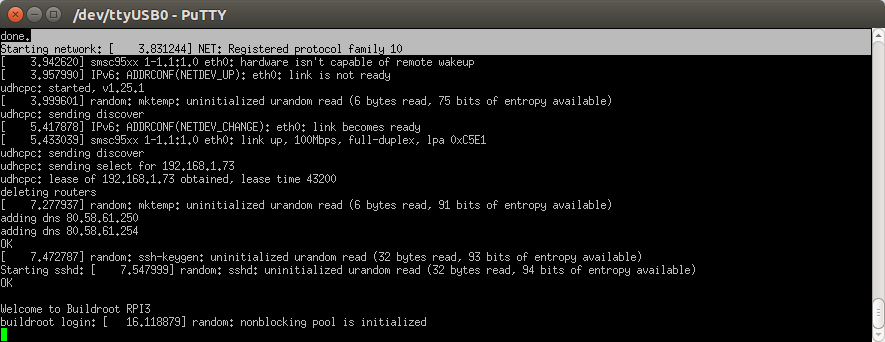
Fig. 3.16 Linux Running in the RaspBerry Pi
Tip
[DHCP Server]: The DHCP server providing the IP address to the RPI should be active in your network. In the UPM ETSIST labs, there is no cabled network, only WIFI. If you are using the RPI at home, the DHCP server is running in your router. The method used to assing IP addresses is different from one manufactures to others. If you want to know the IP address assigned, you have two options: use a serial cable connected to the RPI (ifconfig command) or check the router status web page and display the table of the DHCP clients connected. Looking for the MAC in the list, you will obtain the IP address.
3.9. Connecting the RPI to the cabled ethernet network
3.9.1. Inspecting the configuration of the network interface generated automatically by Buildroot
Inspect the content of /etc/network/interfaces and /etc/init.d/S40network. You will see content similar to this in the interfaces file:
# interface file auto-generated by buildroot

auto lo
iface lo inet loopback

auto eth0
iface eth0 inet dhcp
     pre-up /etc/network/nfs_check
     wait-delay 15
     hostname $(hostname)
This configuration activates the use of eth0 with DHCP support. Test the connectivity, trying to connect to another computer in the laboratory. Use the ping command.
Note
[Help]: If you run the ping command in the Raspberry trying to connect with a computer in the laboratory, you probably obtain a connection timeout. Consider that computers running Windows could have the firewall activated. You can also try to run the ping on a windows computer or on Linux virtual machine. In this case, the RPI does not have a firewall running, and the connection should be successful.
Question
What is the MAC address of your RPI interface? Use the dmesg command to see the kernel boot parameters and identify the method used to get the MAC address from the hardware.
3.10. Adding WIFI support
3.10.1. Adding mdev support to Embedded Linux
The folder <buildroot-folder>/package/busybox contains two files named S10mdev and mdev.conf. These files have to be added to the target filesystem. This step is done by adding these commands to the <buildroot-folder>/board/raspberrypi4-64/post-build.sh script:
cp <buildroot-folder>/package/busybox/S10mdev ${TARGET_DIR}/etc/init.d/S10mdev
chmod 755 ${TARGET_DIR}/etc/init.d/S10mdev
cp <buildroot-folder>/package/busybox/mdev.conf ${TARGET_DIR}/etc/mdev.conf
Note
[mdev] mdev provides a method to add or remove hotplug devices in Linux.
3.10.2. Adding the Broadcom firmware support for Wireless hardware
The hardware element included in the RPI-4 for the Wireless communication is implemented with the BCM43438 chip. It is needed to include the software packages with the firmware’s chip and the wireless utilities.
Execute “make ……. menuconfig”. Navigate to “Target Packages->Hardware Handling->Firmware-> bcrmfmac-sdio-firmware-rpi” and select the “bcrmfmac-sdio-firmware-rpi-wifi”.
Before compiling Buildroot we need to add more software supporting the configuration of the WIFI.
Navigate to “Target Packages->Networking Applications” and select
“crda”
“ifupdown scripts”
“iw”
“wireless-regdb”
“wireless tools”
“wpa_supplicant”
“Enable EAP”
“Enable WPS”
“Install wpa_cli binary”
“Install wpa_client shared library”
“Instal wpa_passphrase binary”
Add these lines to ./board/rapsberrypi4-64/post-build.sh.
cp <buildroot-folder>/board/raspberrypi4-64/interfaces ${TARGET_DIR}/etc/network/interfaces
cp <buildroot-folder>/board/raspberrypi4-64/wpa_supplicant.conf ${TARGET_DIR}/etc/wpa_supplicant.conf
Create the file *<buildroot-folder>*/board/raspberrypi4-64/interfaces adding the highlighted content:
auto lo
iface lo inet loopback

auto eth0
iface eth0 inet dhcp
     pre-up /etc/network/nfs_check
     wait-delay 15
     hostname $(hostname)

auto wlan0
iface wlan0 inet dhcp
       pre-up wpa_supplicant -B -iwlan0 -c/etc/wpa_supplicant.conf
       post-down killall -q wpa_supplicant
       wait-delay 15
Create the file *<buildroot-folder>*/board/raspberrypi4-64/wpa_supplicant.conf with this content (ask professors about the values to be provided as SSID and Key-passwd). You can define as many WIFIs as you want.
network={
    ssid="SSID"
    key_mgmt=WPA-PSK
    psk="PASSWORD"
    priority=9
}
Perform a *make* and burn again the new image in the micro SDcard. Boot the Raspberry and check that you can connect to the wireless network.
3.11. Customizing the Linux kernel
3.11.1. Kernel configuration
Execute the following command to configure the Linux Kernel in Buildroot
$ make O=$PWD -C /home/ubuntu/Documents/rpi/buildroot-2025.02.9/ linux-menuconfig
Using the different menus you can configure specific kernel features, add support for specific device drivers and multiple additional functionalities. The compilation of the Linux kernel package is done with this command:
$ make O=$PWD -C /home/ubuntu/Documents/rpi/buildroot-2025.02.9/ linux-rebuild
In order to get the new sdcard.img file execute:
$ make O=$PWD -C /home/ubuntu/Documents/rpi/buildroot-2025.02.9/