2. Getting started with RPI
This document describes the essential steps students have to follow to boot the Raspberry Pi with a Linux-based distribution such as Raspberry PI OS. After performing the operating system installation, the student must investigate the software tools installed and their potential. Finally, the student must implement a software application that measures 3D acceleration using a transducer. The following variants of application are proposed to the student:
Develop a simple console program developed in the C language.
(Optional) Develop an equivalent application using Python.
Note
[Time to complete the laboratory]: The time necessary to complete steps 1 to 3 in this tutorial is approximately 4 hours.
2.1. Reference Documentation
The following documentation has to be read and checked.
http://www.raspberrypi.org/help/. This web contains some guides and documents covering a lot of topics
https://projects.raspberrypi.org/en . RPI application examples
http://www.python.org. Phyton resources, tutorial, and reference
2.2. Operating System Installation
2.2.1. Downloading and installing Raspberry PI OS
Several Linux and Android distributions can be installed on the Raspberry Pi platform. These Operating System distributions also include multiple software applications and tools such as text editors, music players, video editing and playing, games, development tools, etc.
Follow the steps below to install the Raspbian Operating System:
Download the Raspberry PI Imager tool for your specific OS.
Execute the application, and a window will be displayed.
First, choose the Raspberry PI hardware, in this case, Raspberry PI 4 Model B (see Fig. 2.1).
Choose the Operating System (see Fig. 2.2) and Raspberry PI OS 64 bits version.
Next, choose the storage device where the OS image will be written (see Fig. 2.3).
Now, set the device hostname (see Fig. 2.4).
Then, set the localisation options (see Fig. 2.5). Set the keyboard to your language.
Next, set the user configuration (see Fig. 2.6). Set the username to rpi-student and the password to rpi.
Now, set the WiFi configuration (see Fig. 2.7). Set the SSID to RPI and the password to UPMRPI2024.
Enable SSH so you can connect remotely to the RPI (see Fig. 2.8).
Finally, write the image to the SD card (see Fig. 2.9).
Warning
[VERY IMPORTANT]: Confirm the destination device where the image is burned because this information is not recoverable.
Wait until the program ends writing the SD Card (this can take up to one hour depending on your SD card category and model).
Note
You can find more information about the Raspberry Pi Imager tool in the official documentation
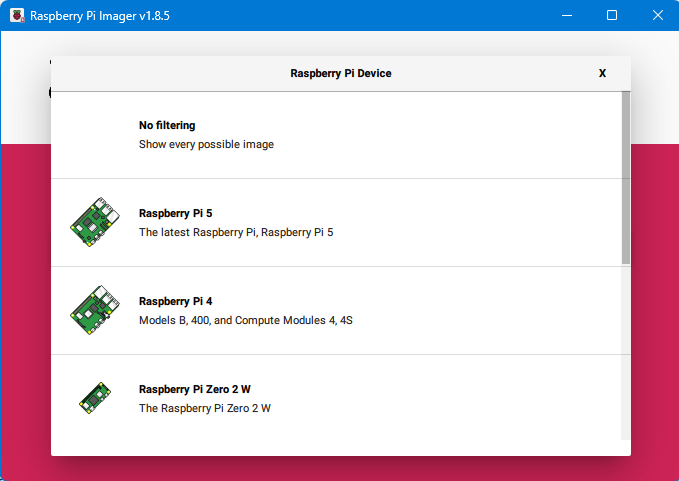
Fig. 2.1 Raspberry Pi Imager HW model
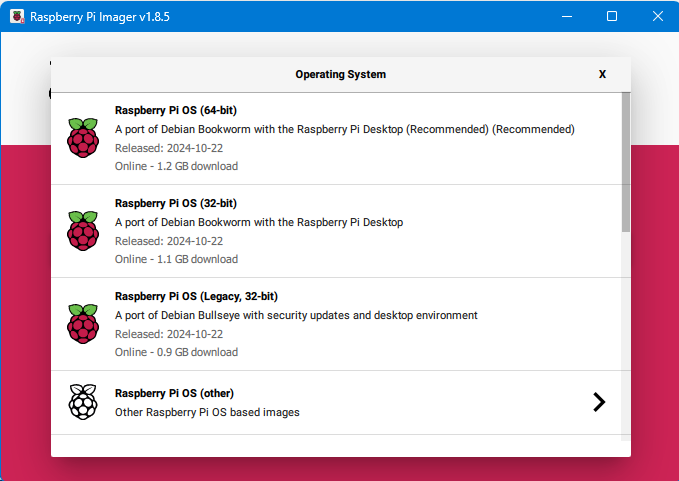
Fig. 2.2 Raspberry Pi Imager OS selection
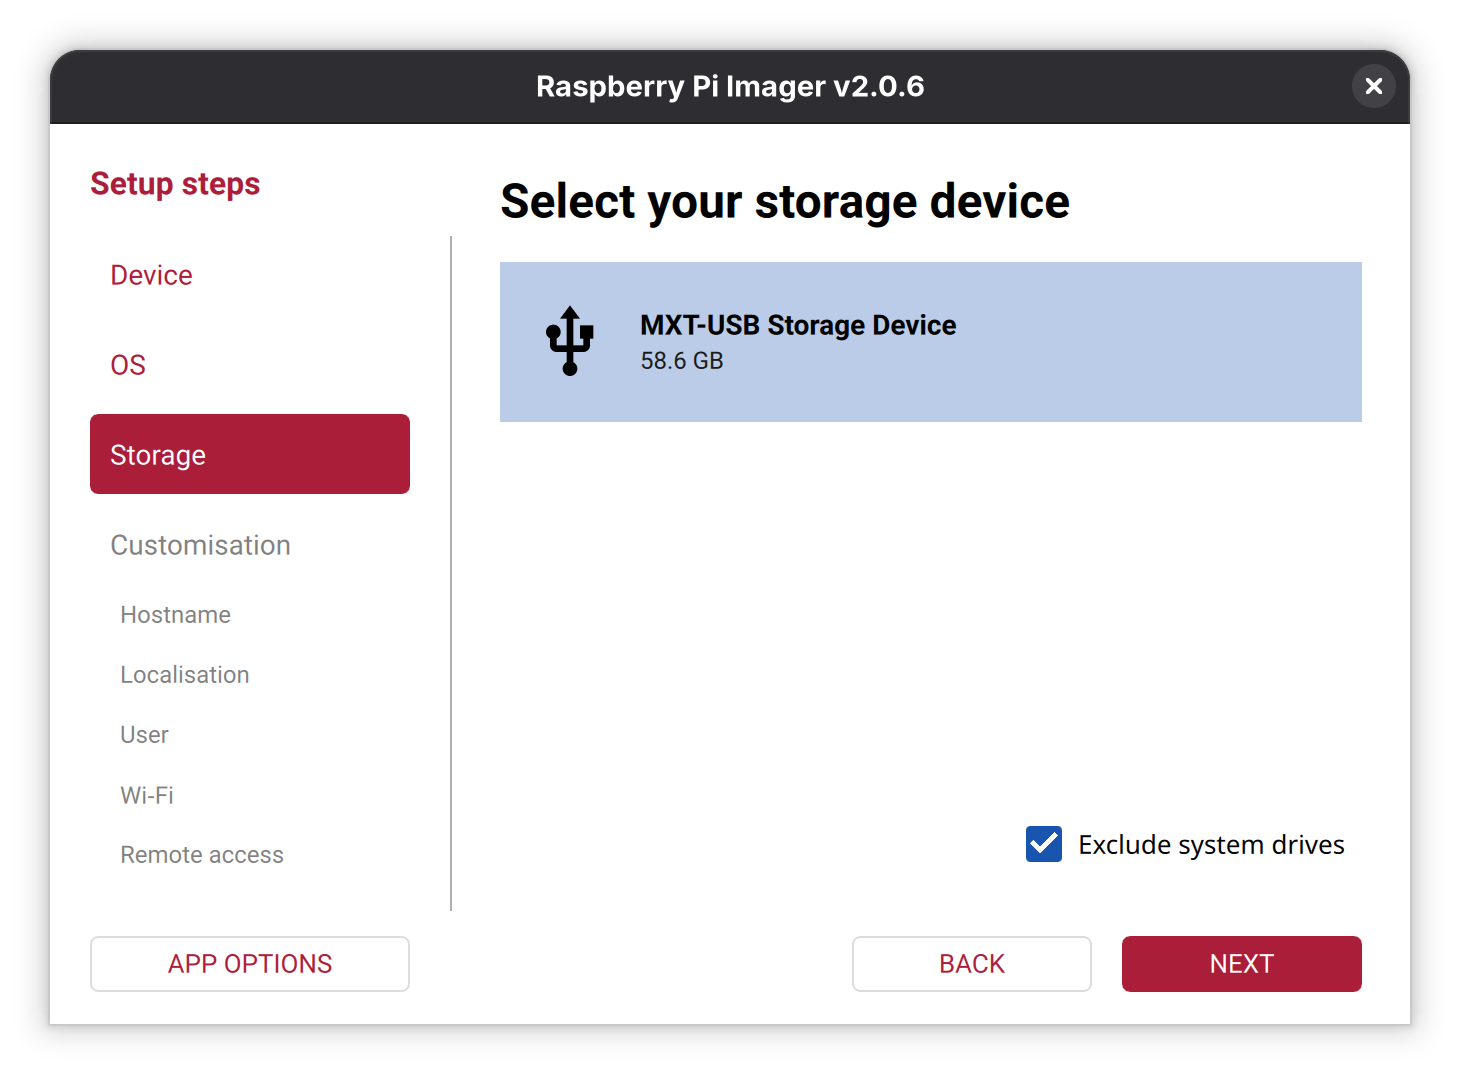
Fig. 2.3 Raspberry Pi Imager Storage selection
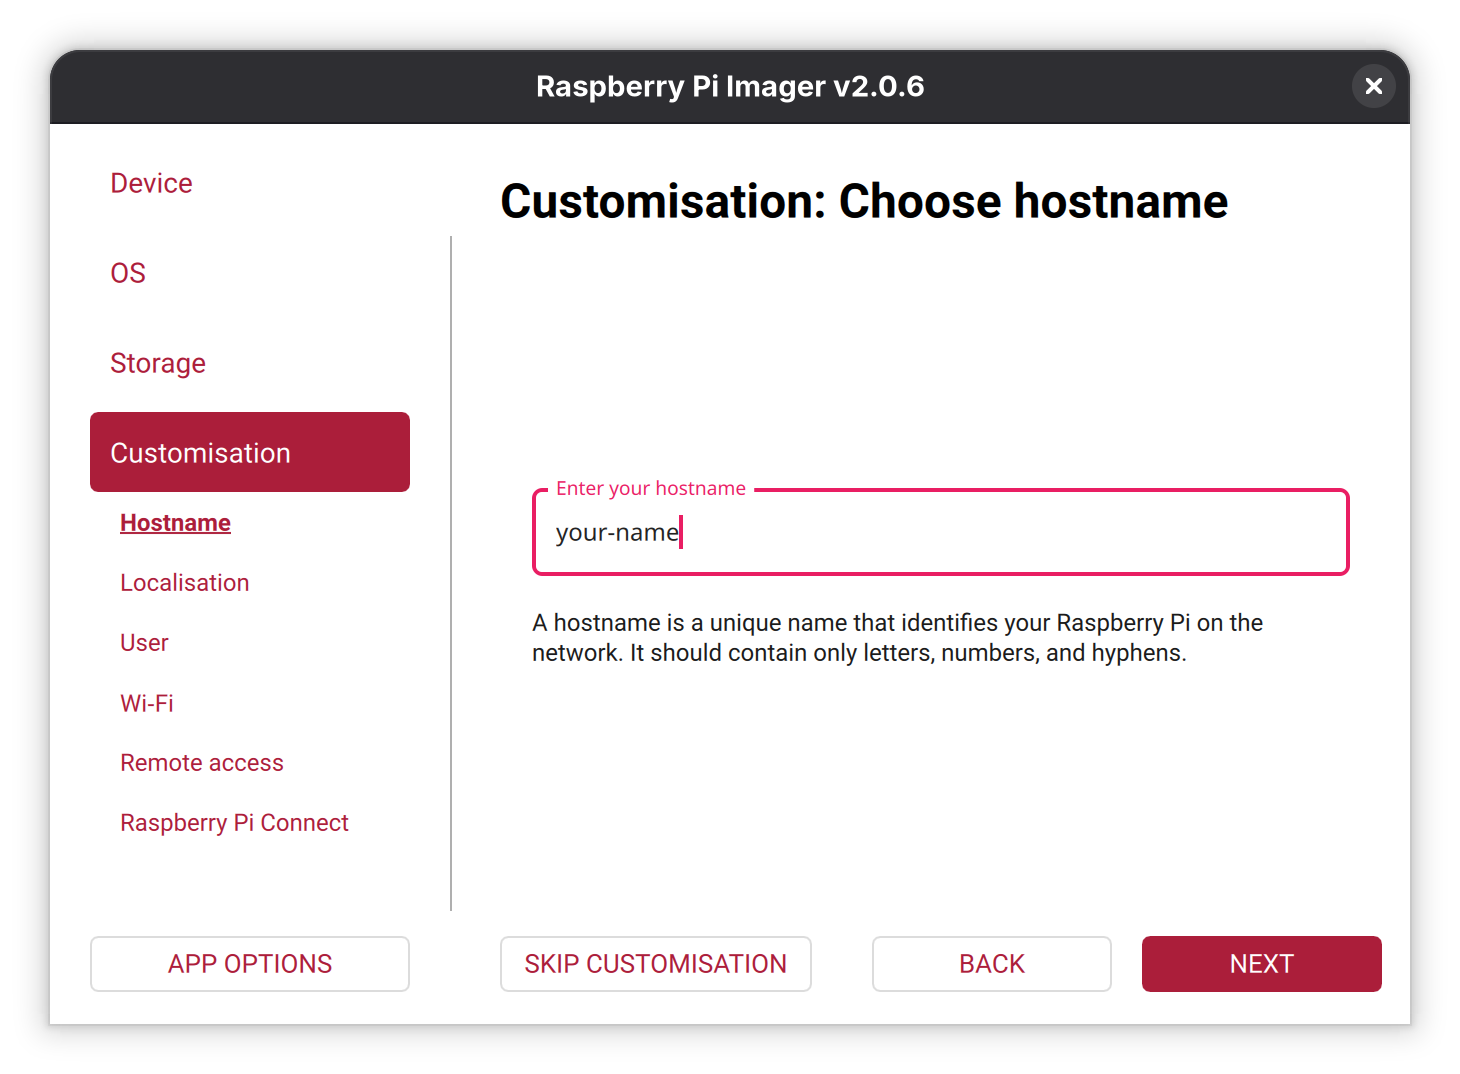
Fig. 2.4 Raspberry Pi Imager device hostname
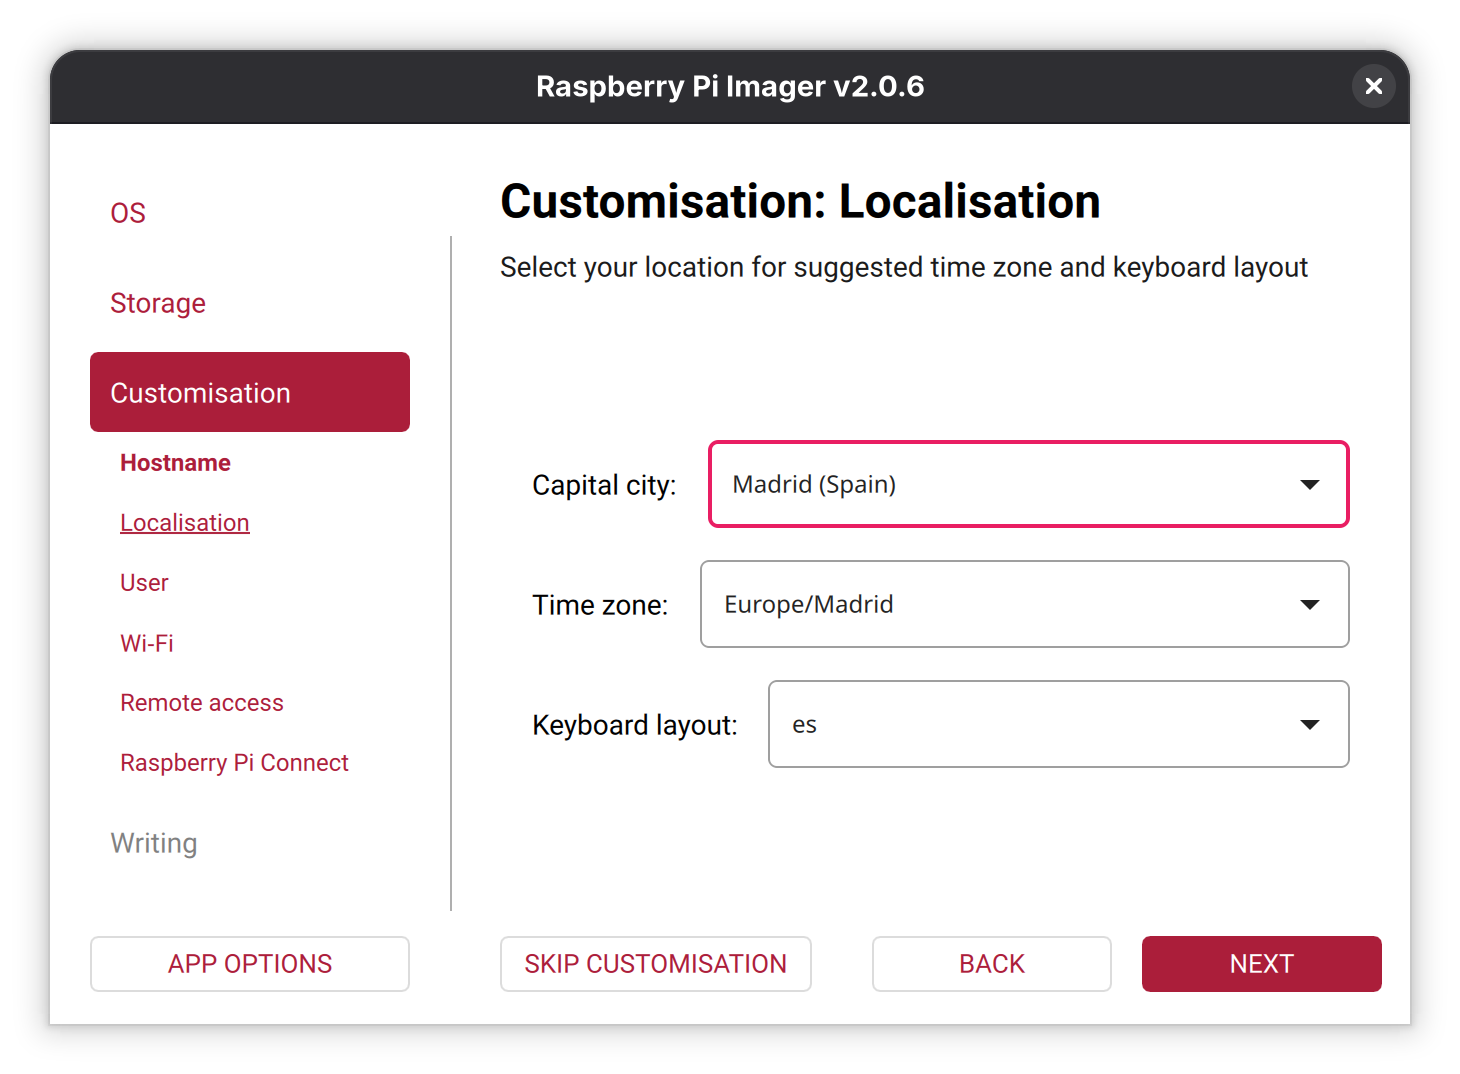
Fig. 2.5 Raspberry Pi Imager localisation and keyboard settings
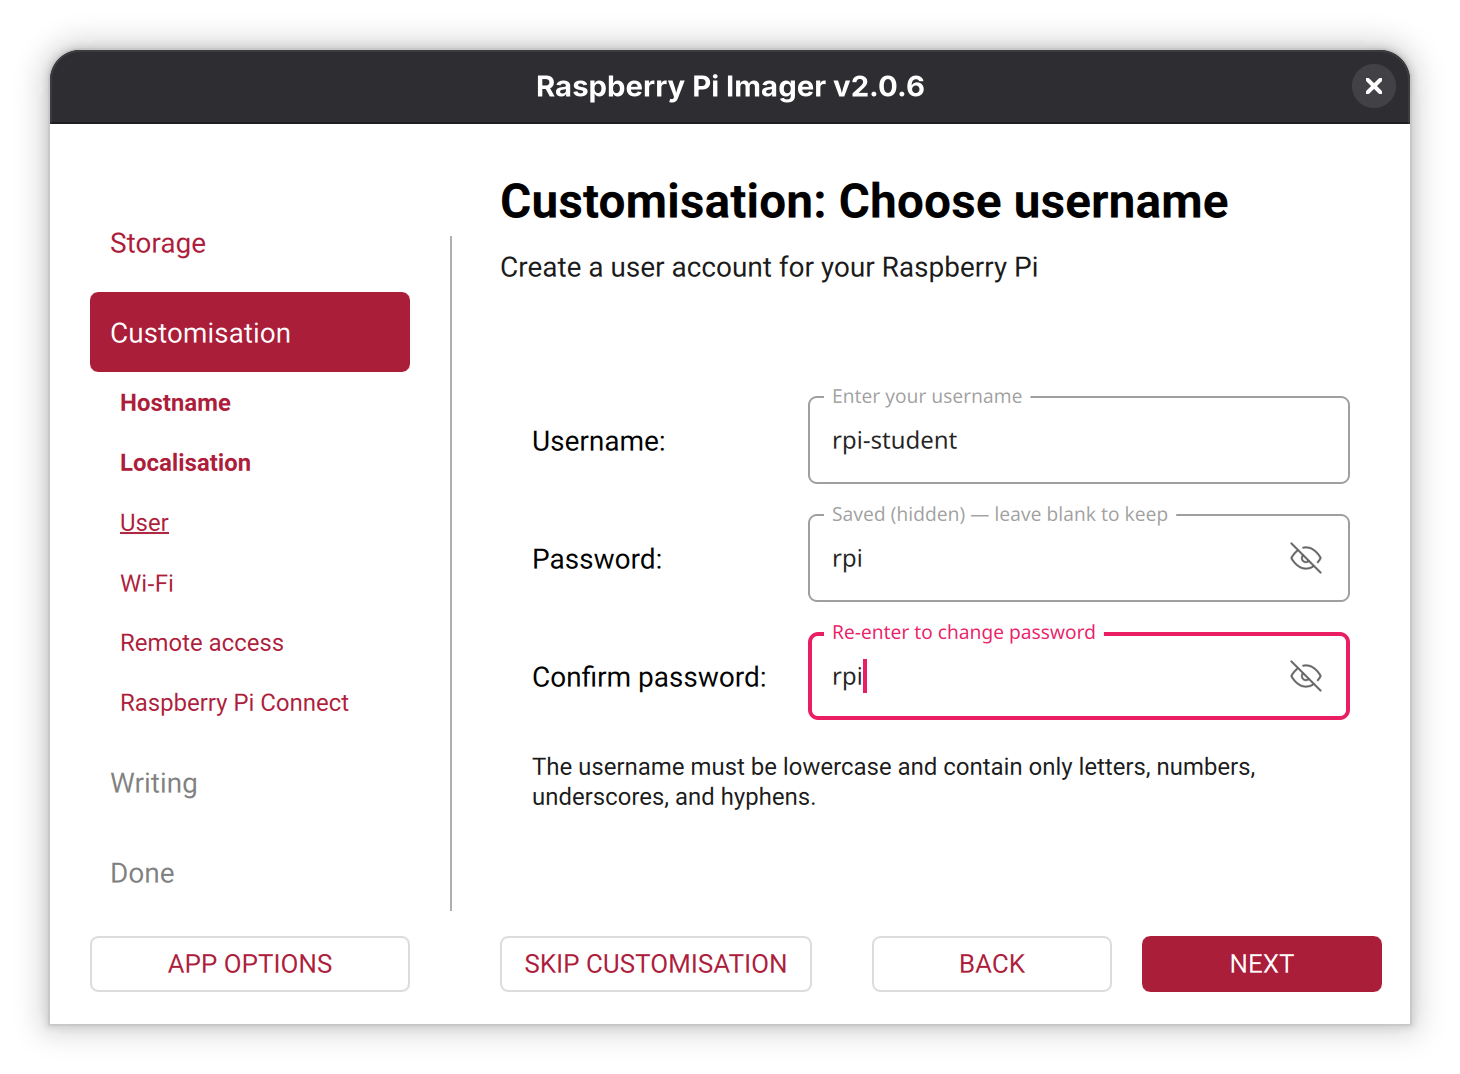
Fig. 2.6 Raspberry Pi Imager user settings
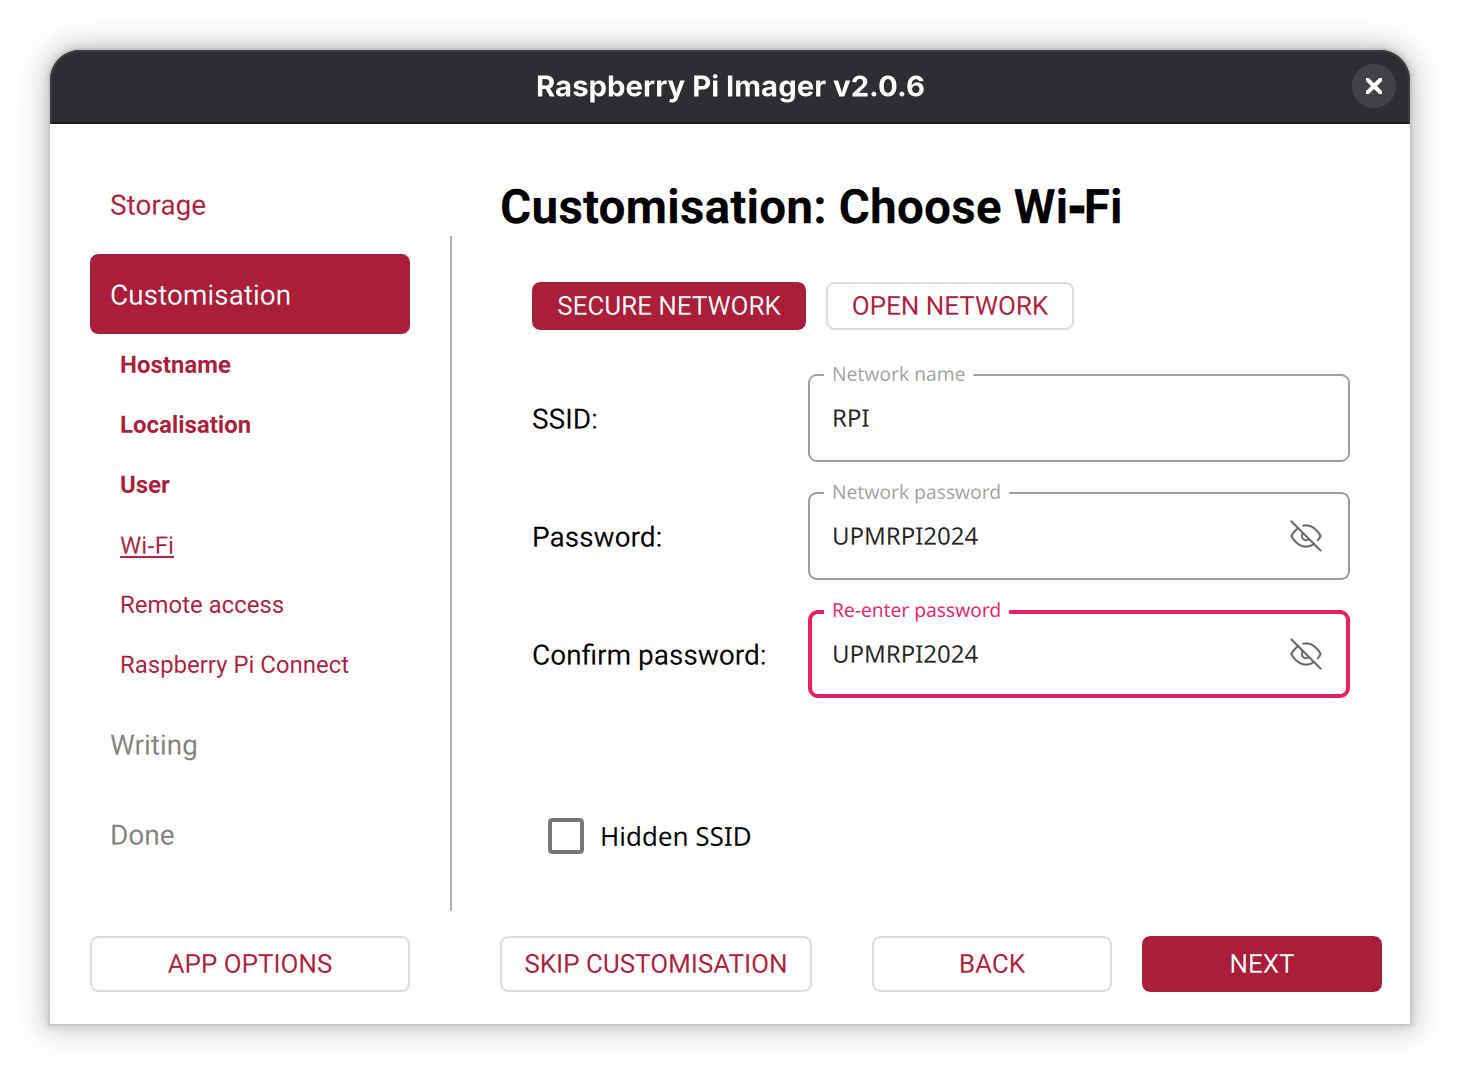
Fig. 2.7 Raspberry Pi Imager WiFi settings
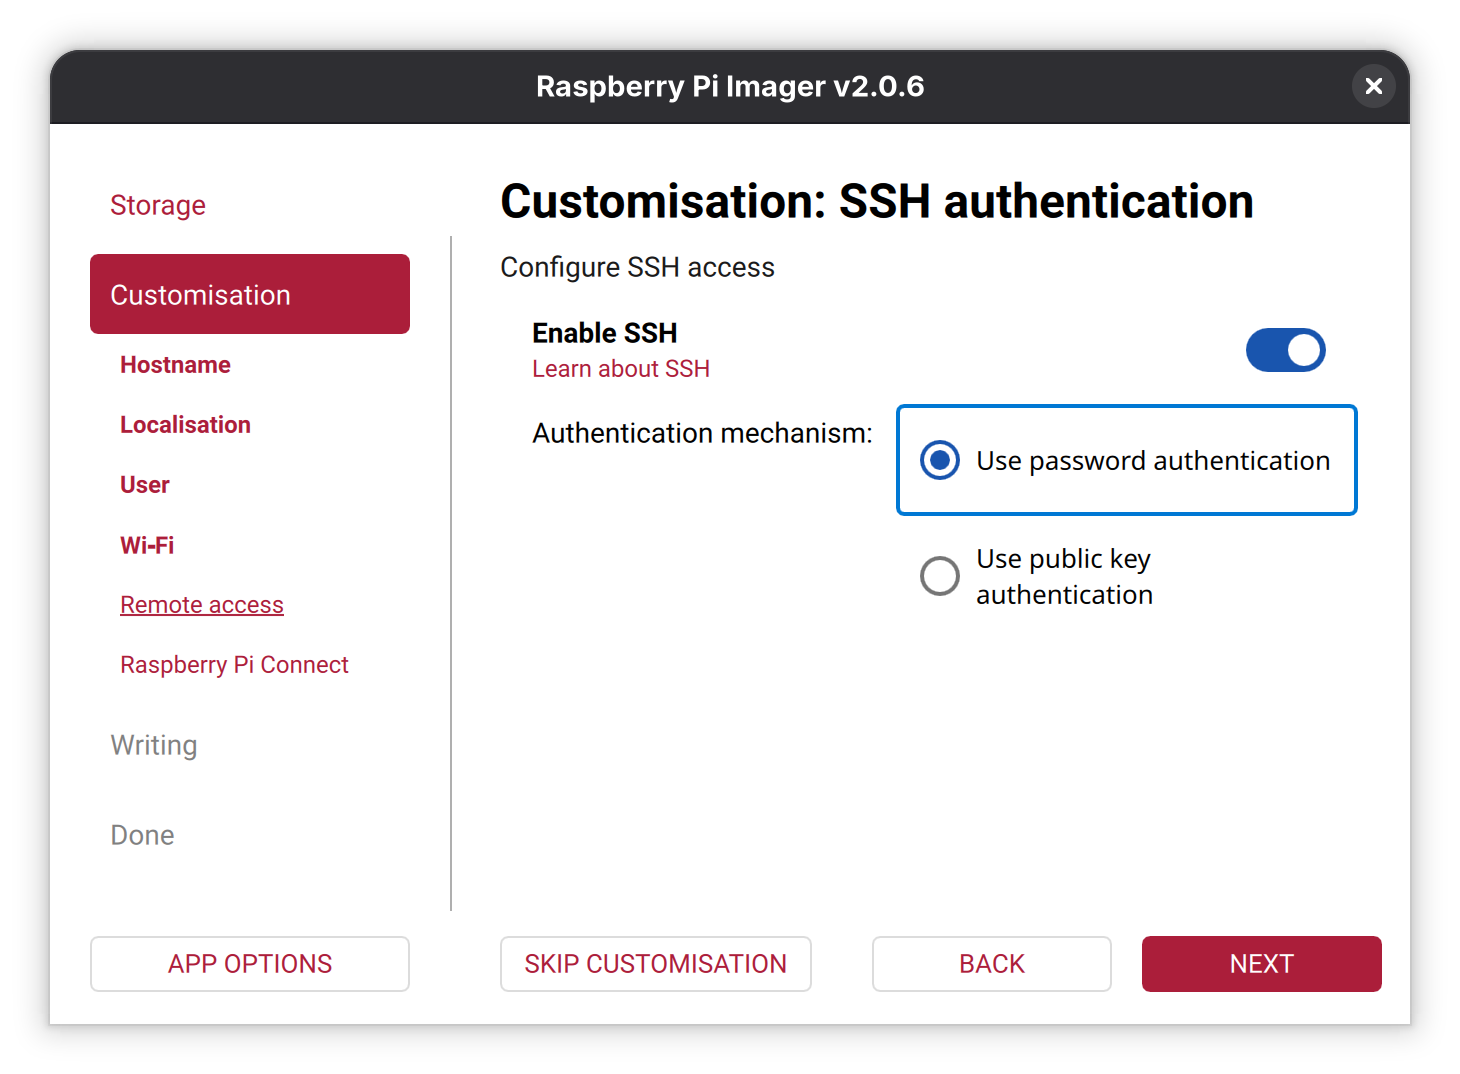
Fig. 2.8 Raspberry Pi Imager SSH settings
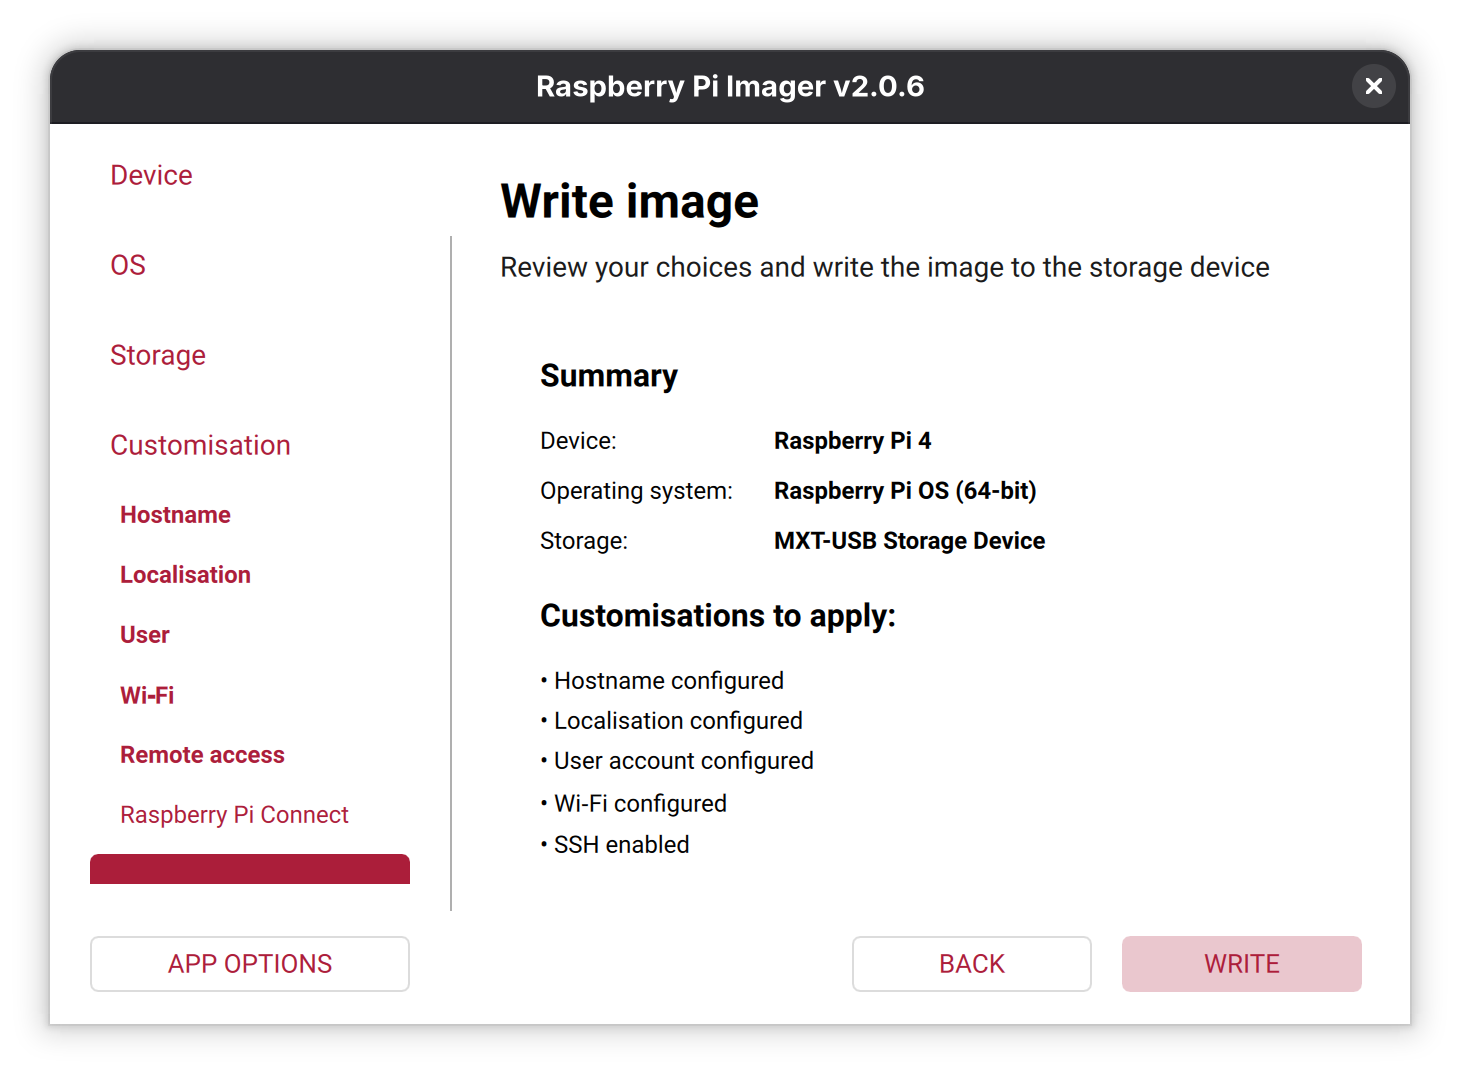
Fig. 2.9 Raspberry Pi Imager write SD card
2.2.2. Setting up the Raspberry Pi
We need to interact with the Raspberry Pi for the activities described in this document. There are three ways to establish this interaction:
The easiest one is connecting an HDMI monitor, a USB keyboard, and a USB mouse. This configuration allows us to use the Raspberry Pi as we would with a regular computer. Once the RPI is booted, we can set the WiFi connections and other settings such as enable the use of a serial line.
Opening an SSH session between your computer and the Raspberry Pi without connecting additional peripherals. This kind of configuration is known as headless start (use the rpi-student login).
The Raspberry Pi must be connected to the same network as your computer. First, you need to discover the Raspberry Pi IP address (see the section Discovering the RPI IP address).
Use the serial USB-TTL cable that you need to connect to the GPIO expansion connector. This requires first to enable the serial line in the Raspberry PI OS using the raspi-config tool. The connection of the USB-TTL cable is depicted in Fig. 2.10.
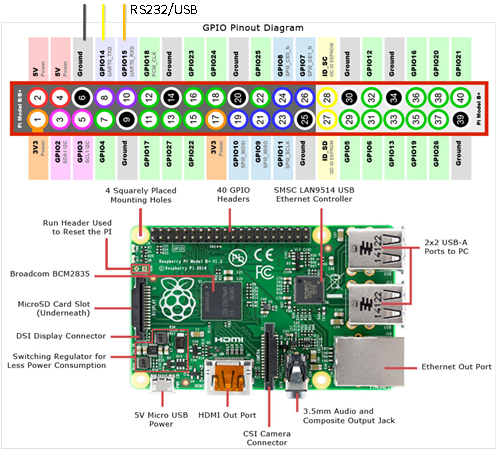
Fig. 2.10 Detail of expansion connector highlighting the USB-TTL RS232
2.2.3. Reviewing the SD card content
Plug in the SD card into the computer.
You should now see one new drive in the System Explorer (Windows)/Nautilus (Ubuntu) named “boot”. In Linux you will see two partitions mounted in your system. Open the partition/unit identified as “boot”.
Note
[VERY IMPORTANT]: This is the partition used by Raspberry to make the necessary hardware configuration before starting the operating system. Beware of not deleting or modifying files other than those described in this manual, or the Raspberry may not boot.
List the content of the boot partition (FAT32) and identify the files as in Fig. 2.11 (Ubuntu Linux).
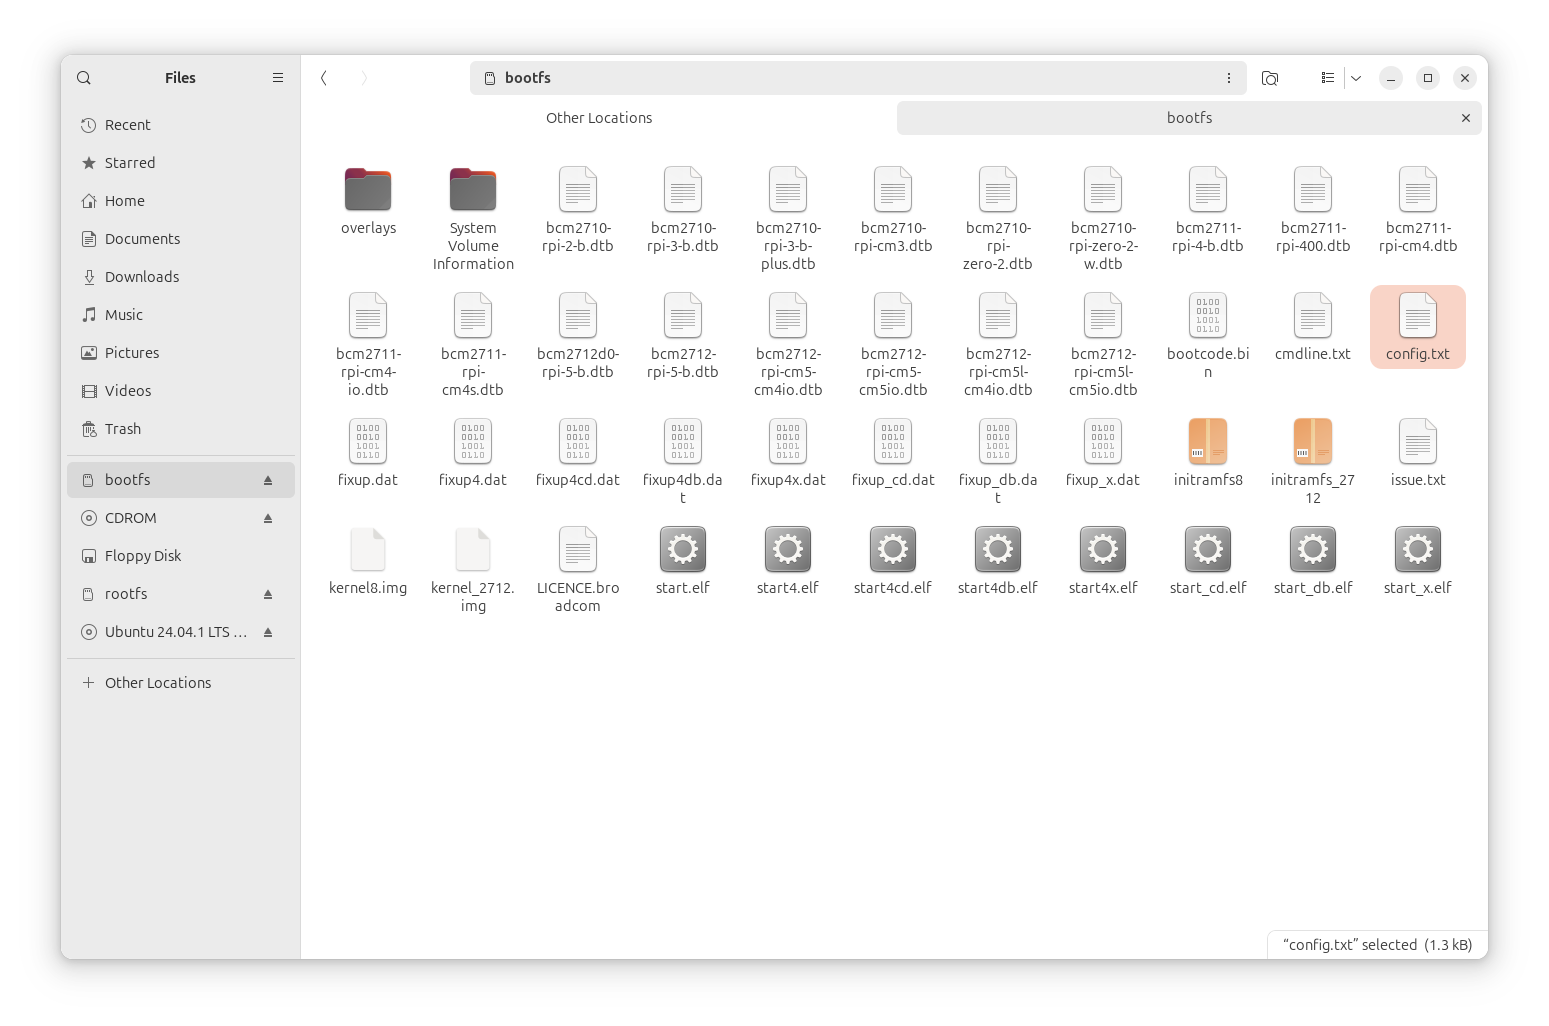
Fig. 2.11 Files available in the FAT32 partition
2.2.4. Booting the RPI
Insert the SD card and connect the power supply and all other cables needed. The first time you boot your RPI you will see how the RPI is configured (this information is only displayed in the HDMI monitor) and rebooted. Wait 1 or 2 minutes (this depends again on your SD card category) until the RPI is completely booted.
Note
[Security]: Having the default user and password supposes a security issue, more if the SSH sessions are enabled. You can always change the password by executing the command passwd once logged in.
2.2.5. Discovering the RPI IP address
To open an SSH session from your computer to the Raspberry Pi you need to know its IP address. There are multiple ways to discover the Raspberry Pi IP address:
Use an IP Scanner utility, and scan in the range of your network. For example, you can quickly identify a Raspberry Pi as they use the hostname “raspberrypi.local” by default. This tool cannot be used at the UPM lab.
If you know your Raspberry Pi MAC address, you can set the DHCP server to assign a static IP to the Raspberry Pi MAC. This is typically done in the router configuration. Please, consider that Ethernet and WiFi ports have different MAC addresses. In the laboratory, your Raspberry can have only a dynamically assigned IP in the WIFI network with SSID RPI (ask your instructor to verify the configuration).
You could open an RS232 serial connection in the Raspberry Pi GPIO ports and use the command line (ifconfig command) to obtain the IP or set the desired IP and netmask.
2.2.6. Raspberry Pi OS Update
You can update and upgrade the OS if you have an internet connection. Please, do not update the OS during the classes, as this operation will require some time. You can update the OS by running the following commands:
$ sudo apt update
$ sudo apt upgrade
2.3. Integration of a 3-axis accelerometer with Raspberry-Pi
2.3.1. Specifications
The student must investigate functions and commands and implement a C program to get the following requirements:
Show the values of the 3-axis acceleration obtained from the MPU-6000 I2C sensor.
The measurement readings are shown every 3 seconds.
2.3.2. Suggested Improvements
Analyses the problem of offsets in the values returned. Define and implement a method to get corrected values
Get stop the program if “CRTL-C” is typed.
2.3.3. Optional: Python Script
For advanced students, the implementation of this exercise in Python is proposed. For this, you can use any of the multiple Python modules that gain access to I2C interface in the Raspberry Pi.
2.4. Compiling & linking C program in Linux
In Linux, C/c++ programs are compiled and linked using the “make” command. This command searches a “Makefile”. A “Makefile” is a text file with the necessary information to compile and link and must be in the same directory of myprogram.c. The result will be myprogram.o and myprogram (executable).
DEBUG= -O2 #Debugging Level

CC= gcc #Compiler command
INCLUDE= -I/usr/local/include #Include directory
CFLAGS= $(DEBUG) -Wall $(INCLUDE) -Winline #Compiler Flags
LDFLAGS= -L/usr/local/lib #Linker Flags

LIBS= -lpthread -lm #Libraries used if needed

SRC = myprogram.c

OBJ  = $(SRC:.c=.o)
BIN  = $(SRC:.c=)

$(BIN):       $(OBJ)
     @echo [link] $@
     $(CC) -o $@ $< $(LDFLAGS) $(LIBS)
.c.o:
     @echo [Compile] $<
     $(CC) -c $(CFLAGS) $< -o $@

clean:
     @rm -f $(OBJ) $(BIN)
2.5. Questions to be reported to instructors
Explain the content of the config.txt file in the FAT32 partition of the uSDCARD of your RPI
How the I2C interface is enabled? Is there any change in the config.txt file?
Could you describe the commands used to compile a C/C++ program in Linux?
What is a library? What is the difference between a static and a shared library?
Summarize the utility of the makefile file and the make command.
What is the preferred utility to debug a C program in Linux?
How can you obtain the serial number of your Raspberry Pi? Is there any relation between the serial number and the MAC address?