4. Using the integrated development environment Eclipse/CDT
4.1. Eclipse IDE for C/C++ developers
The Eclipse IDE CDT is installed in the virtual machine. You can execute it running eclipse in a window terminal.
4.2. Cross-Compiling applications using Eclipse
How will a program be compiled and linked? Remember that we are developing cross applications. We are developing and compiling the code in a Linux x86_64 architecture, and we are executing it on an ARM one (see Fig. 4.1).
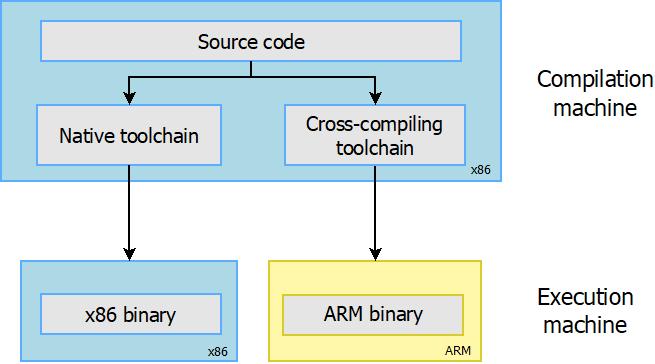
Fig. 4.1 Cross Toolchain. Figure copied from “Free Electrons” training materials (http://free-electrons.com/training/)
The first question is where the cross-compiler and other cross-tools are located. The answer is this: in the folder build/host/usr/bin. If you inspect this folder’s content, you can see the entire compiling, linking, and debugging tools (see Fig. 4.2). These programs are executed in your x86_64 computer, but they generate code for the ARM processor.
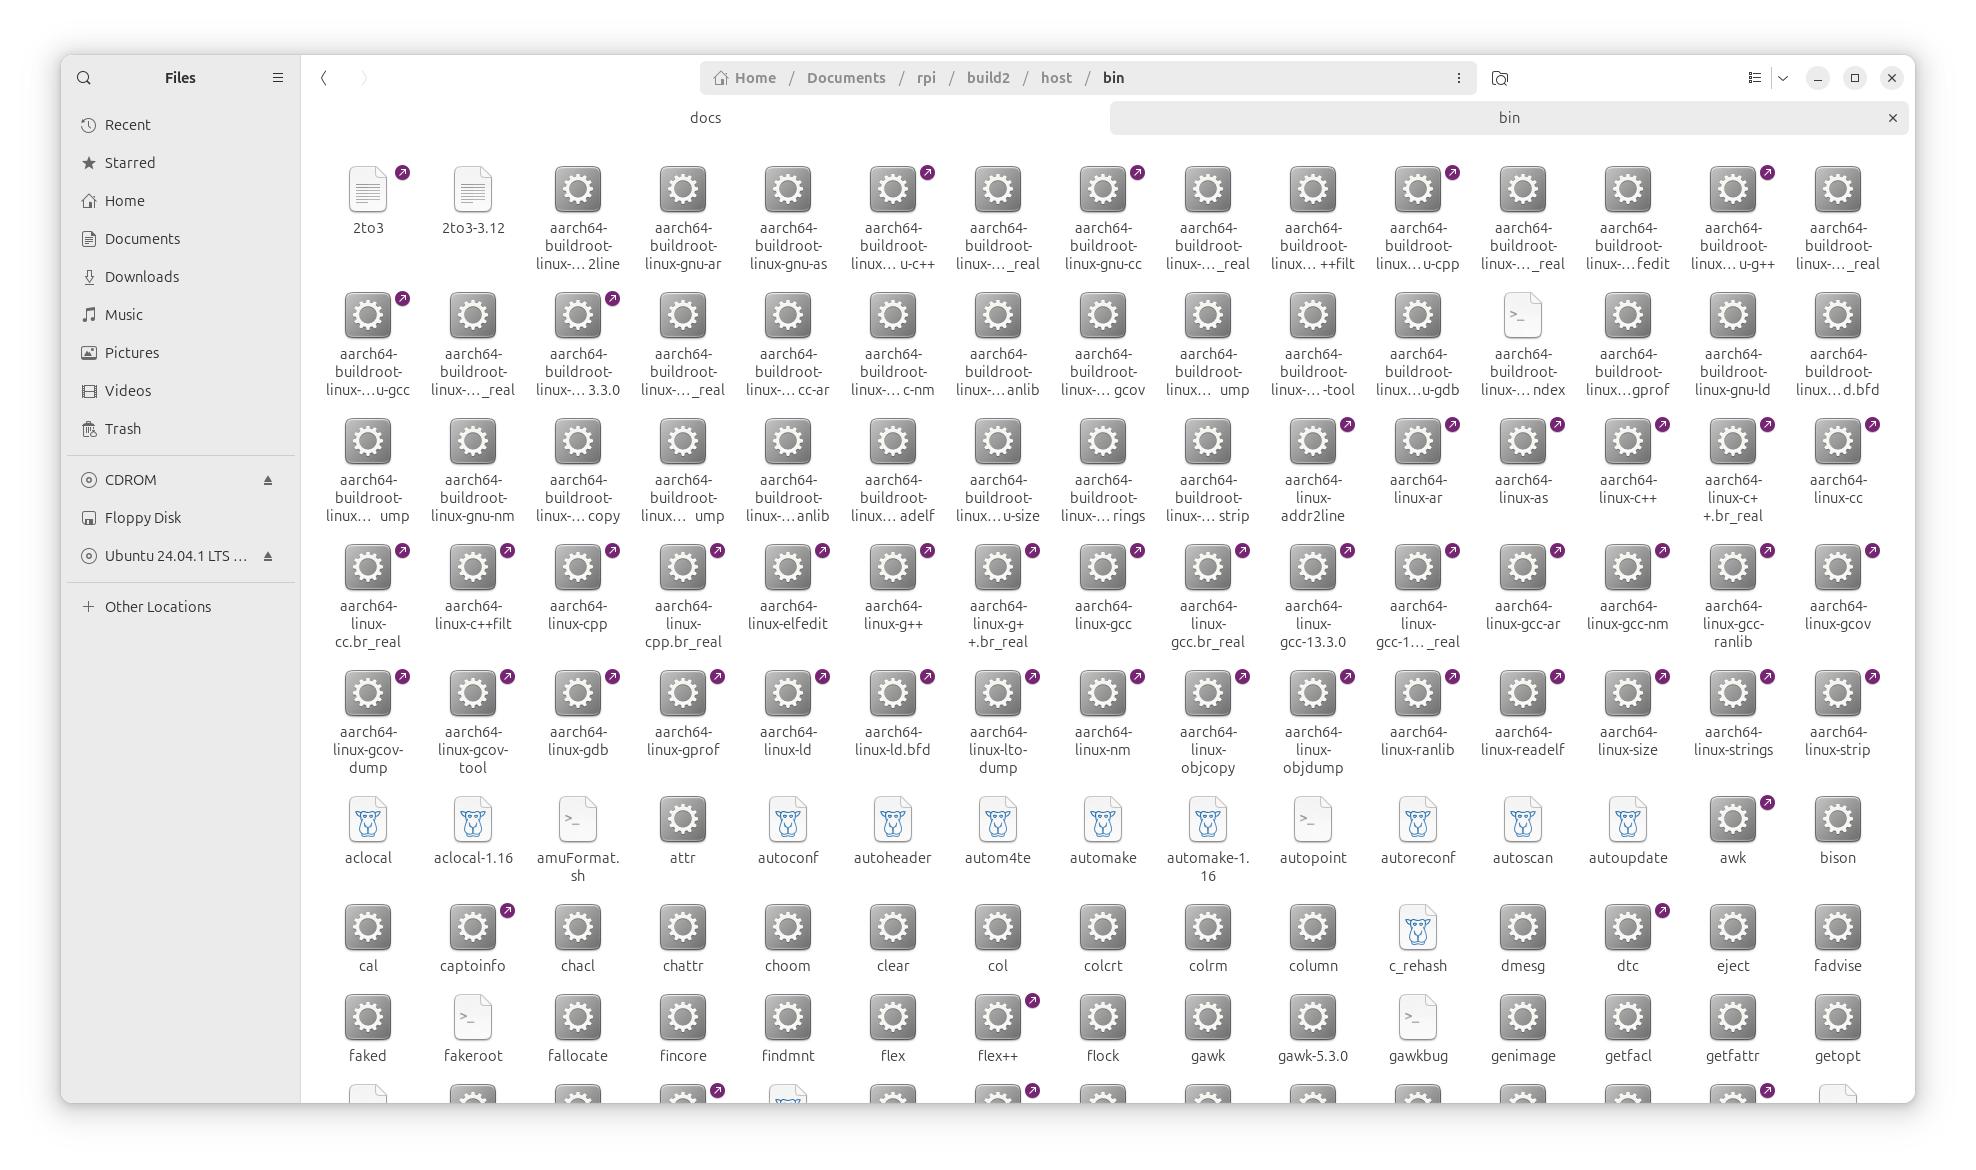
Fig. 4.2 Cross-compiling tools installed in the host computer
In a Terminal window execute the following commands:
# change the directory to the folder where `build` directory is
$ cd ./build/host
$ source environment-setup
# run eclipse in the same terminal. In this case eclipse is available in your ubuntu user folder
$ /home/ubuntu/eclipse/cpp-2024-09/eclipse/eclipse &
The environment-setup file contains the code listed below.
cat <<'EOF'
 _           _ _     _                 _
| |__  _   _(_) | __| |_ __ ___   ___ | |_
| '_ \| | | | | |/ _` | '__/ _ \ / _ \| __|
| |_) | |_| | | | (_| | | | (_) | (_) | |_
|_.__/ \__,_|_|_|\__,_|_|  \___/ \___/ \__|

       Making embedded Linux easy!

Some tips:
* PATH now contains the SDK utilities
* Standard autotools variables (CC, LD, CFLAGS) are exported
* Kernel compilation variables (ARCH, CROSS_COMPILE, KERNELDIR) are exported
* To configure do "./configure $CONFIGURE_FLAGS" or use
  the "configure" alias
* To build CMake-based projects, use the "cmake" alias

EOF
if [ x"$BASH_VERSION" != x"" ] ; then
     SDK_PATH=$(dirname $(realpath "${BASH_SOURCE[0]}"))
elif [ x"$ZSH_VERSION" != x"" ] ; then
     SDK_PATH=$(dirname $(realpath $0))
else
     echo "unsupported shell"
fi
export "AR=aarch64-buildroot-linux-gnu-gcc-ar"
export "AS=aarch64-buildroot-linux-gnu-as"
export "LD=aarch64-buildroot-linux-gnu-ld"
export "NM=aarch64-buildroot-linux-gnu-gcc-nm"
export "CC=aarch64-buildroot-linux-gnu-gcc"
export "GCC=aarch64-buildroot-linux-gnu-gcc"
export "CPP=aarch64-buildroot-linux-gnu-cpp"
export "CXX=aarch64-buildroot-linux-gnu-g++"
export "FC=aarch64-buildroot-linux-gnu-gfortran"
export "F77=aarch64-buildroot-linux-gnu-gfortran"
export "RANLIB=aarch64-buildroot-linux-gnu-gcc-ranlib"
export "READELF=aarch64-buildroot-linux-gnu-readelf"
export "STRIP=aarch64-buildroot-linux-gnu-strip"
export "OBJCOPY=aarch64-buildroot-linux-gnu-objcopy"
export "OBJDUMP=aarch64-buildroot-linux-gnu-objdump"
export "AR_FOR_BUILD=/usr/bin/ar"
export "AS_FOR_BUILD=/usr/bin/as"
export "CC_FOR_BUILD=/usr/bin/gcc"
export "GCC_FOR_BUILD=/usr/bin/gcc"
export "CXX_FOR_BUILD=/usr/bin/g++"
export "LD_FOR_BUILD=/usr/bin/ld"
export "CPPFLAGS_FOR_BUILD=-I$SDK_PATH/include"
export "CFLAGS_FOR_BUILD=-O2 -I$SDK_PATH/include"
export "CXXFLAGS_FOR_BUILD=-O2 -I$SDK_PATH/include"
export "LDFLAGS_FOR_BUILD=-L$SDK_PATH/lib -Wl,-rpath,$SDK_PATH/lib"
export "FCFLAGS_FOR_BUILD="
export "DEFAULT_ASSEMBLER=aarch64-buildroot-linux-gnu-as"
export "DEFAULT_LINKER=aarch64-buildroot-linux-gnu-ld"
export "CPPFLAGS=-D_LARGEFILE_SOURCE -D_LARGEFILE64_SOURCE -D_FILE_OFFSET_BITS=64"
export "CFLAGS=-D_LARGEFILE_SOURCE -D_LARGEFILE64_SOURCE -D_FILE_OFFSET_BITS=64  -Os -g0 -D_FORTIFY_SOURCE=1"
export "CXXFLAGS=-D_LARGEFILE_SOURCE -D_LARGEFILE64_SOURCE -D_FILE_OFFSET_BITS=64  -Os -g0 -D_FORTIFY_SOURCE=1"
export "LDFLAGS="
export "FCFLAGS= -Os -g0"
export "FFLAGS= -Os -g0"
export "PKG_CONFIG=pkg-config"
export "STAGING_DIR=$SDK_PATH/aarch64-buildroot-linux-gnu/sysroot"
export "INTLTOOL_PERL=/usr/bin/perl"
export "ARCH=arm64"
export "CROSS_COMPILE=aarch64-buildroot-linux-gnu-"
export "CONFIGURE_FLAGS=--target=aarch64-buildroot-linux-gnu --host=aarch64-buildroot-linux-gnu --build=x86_64-pc-linux-gnu --prefix=/usr --exec-prefix=/usr --sysconfdir=/etc --localstatedir=/var --program-prefix="
alias configure="./configure ${CONFIGURE_FLAGS}"
alias cmake="cmake -DCMAKE_TOOLCHAIN_FILE=$SDK_PATH/share/buildroot/toolchainfile.cmake -DCMAKE_INSTALL_PREFIX=/usr"
export "PATH=$SDK_PATH/bin:$SDK_PATH/sbin:$PATH"
export "KERNELDIR=/home/ubuntu/Documents/rpi/build/build/linux-custom/"
This script when is sourced in a terminal window sets all the environment variables needed to use the cross-compilation tools and adds the folder of cross-tools to the Linux PATH variable.
The execution of eclipse popups a window inviting you to enter the workspace (see Fig. 4.3). The workspace is the folder that contain eclipse projects created by the user. You can have as many workspaces as you want. Please specify a folder in your account.
Tip
The figures displayed in the following paragraphs can be different depending on the Eclipse version installed

Fig. 4.3 Selection of the workspace for Eclipse. Use a folder in your account.
Select Ok, and the welcome window of Eclipse will be shown ( see Fig. 4.4 ).Next, close the welcome window and the main eclipse window will be displayed ( see Fig. 4.5 ).
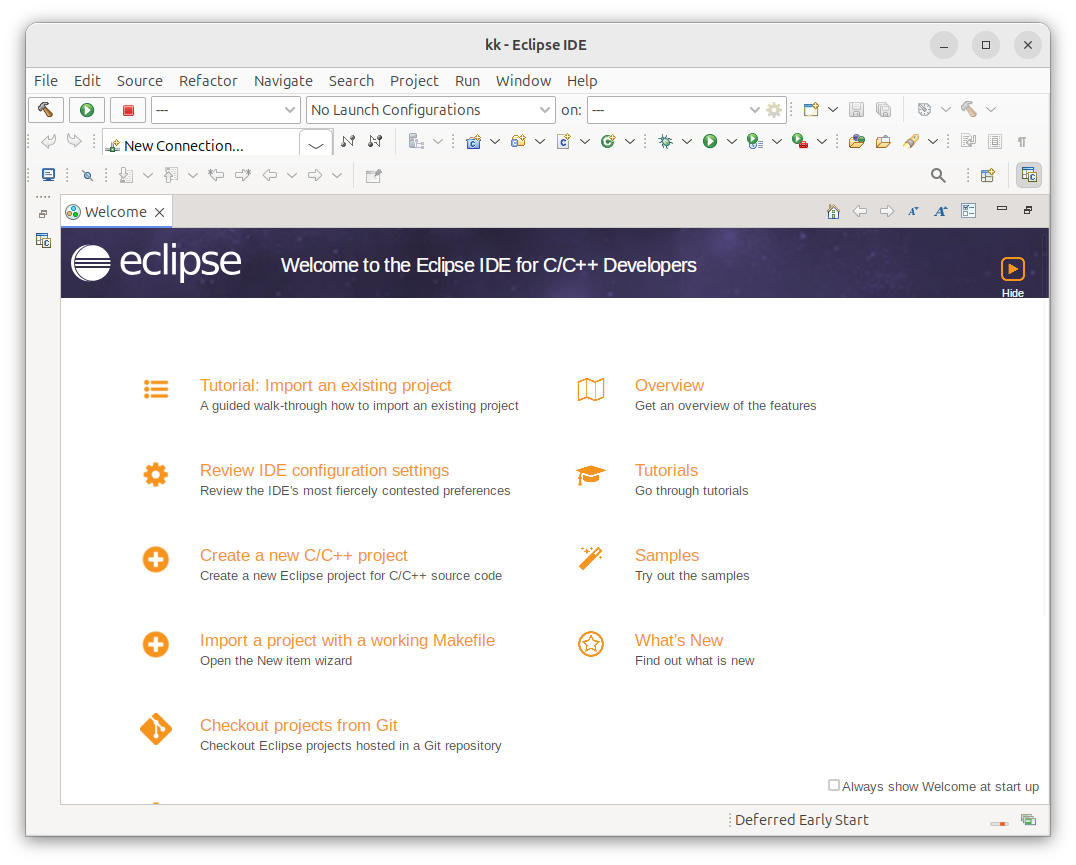
Fig. 4.4 Eclipse welcome window.
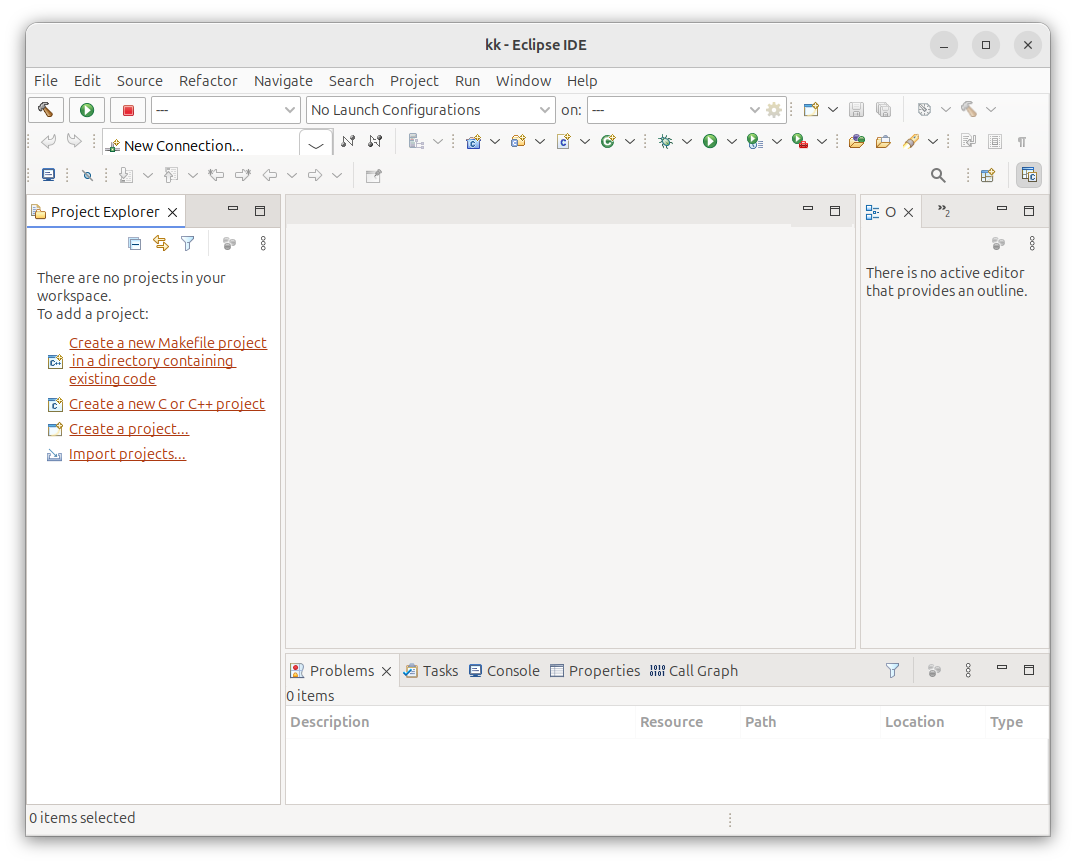
Fig. 4.5 Eclipse main window.
In a terminal window create an empty folder. In this folder create the following files with the content described in Listing 4.1, Listing 4.2 , Listing 4.3, and Listing 4.4. The Makefile uses the environment variables that are defined in the environment where the makefile is run.
 1LIBS= -lpthread -lm #Libraries used if needed
 2SRCS= main.cpp func.cpp
 3BIN=app
 4CFLAGS+= -g -O0
 5OBJS=$(subst .cpp,.o,$(SRCS))
 6all : $(BIN)
 7$(BIN): $(OBJS)
 8    @echo [link] $@
 9    $(CXX) -o $@ $(OBJS) $(LDFLAGS) $(LIBS)
10%.o: %.cpp
11    @echo [Compile] $<
12    $(CXX) -c $(CFLAGS) $< -o $@
13clean:
14    @rm -f $(OBJS) $(BIN)
1#include "func.h"
2#include <iostream>
3int main(void){
4    int b=2;
5    std::cout<<"A is: "<< fun(b) << std::endl;
6}
1#ifndef __FUNC_H
2#define __FUNC_H
3    int fun(int);
4#endif
1int fun(int b){
2    int a=b*2;
3    return a;
4}
In Eclipse select in the left part of the windows Import projects. A new window is popup, select then C/C++ and the option Existing Code as Makefile Project. The window shown in Fig. 4.6 is displayed. Complete the name of the project, select the folder with the code and check Cross GCC in Toolchain for Indexer Settings.
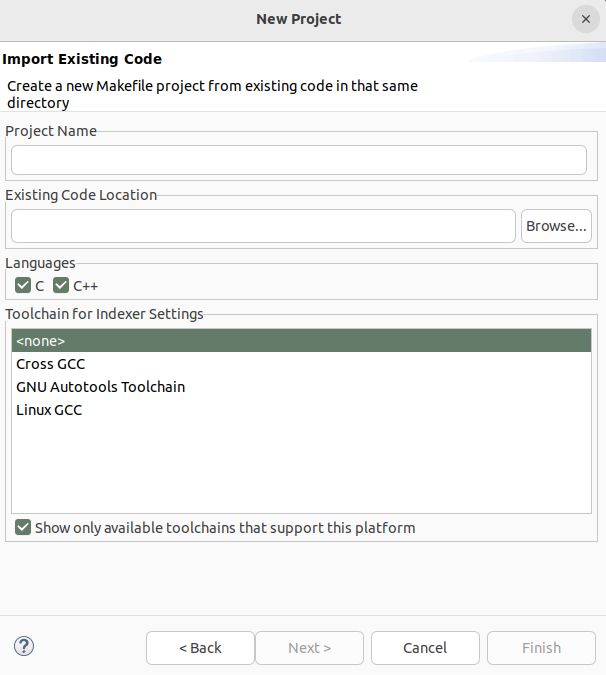
Fig. 4.6 Importing the code.
4.3. Building a project
Once you have configured the cross-chain in Eclipse you can build your project using Project->Build Project. If everything is correct, you will see the eclipse project as represented in Fig. 4.7 . You can clean the project (remove the executable and objects) with Clean.
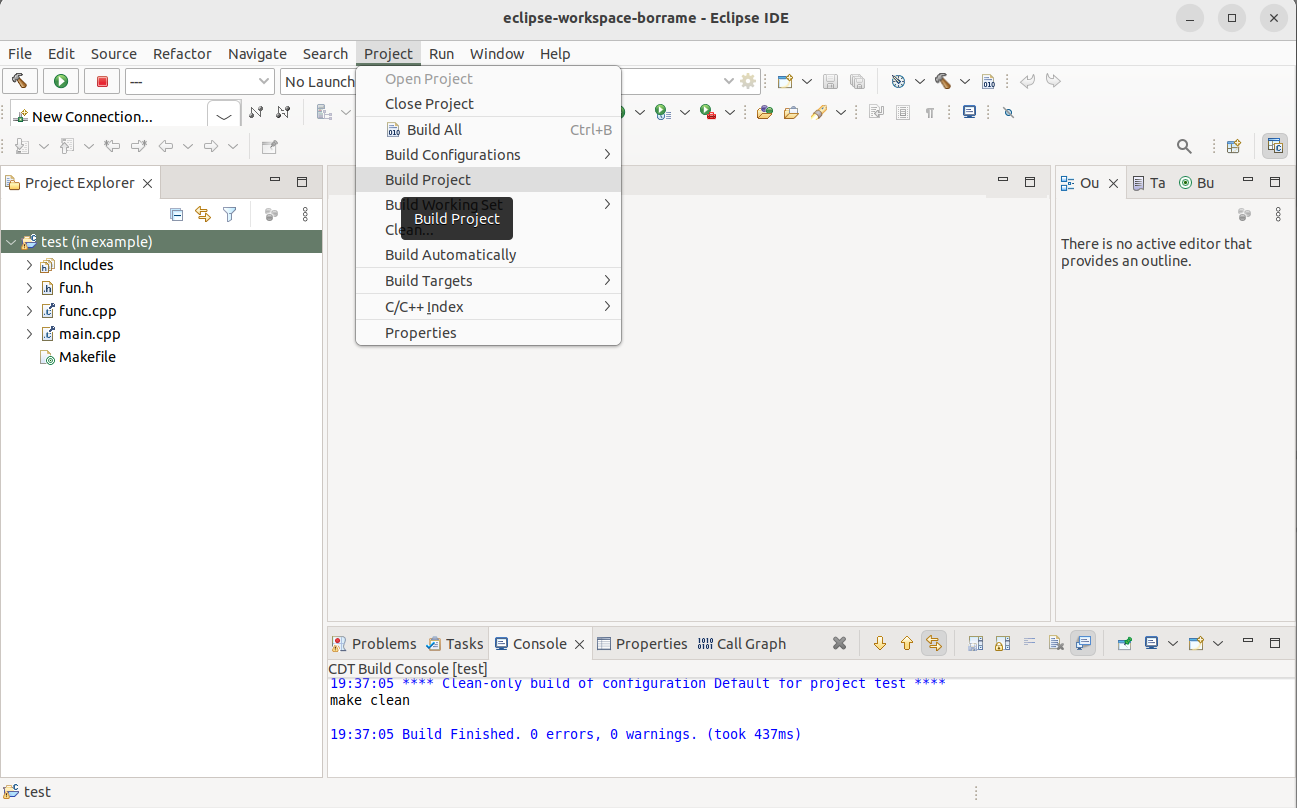
Fig. 4.7 Eclipse project compiled (Binaries has been generated)
Note
[Console in Eclipse]: Have a look at the messages displayed in the Console. You will see how eclipse is calling the cross compiler with different parameters.
4.4. Moving the binary to the target
In order to copy the executable to the target, you have different options. You can use the Linux application called scp or other similar applications. In our case, we are going to use the “Other Locations….” utility included in the nautilus explorer ( Fig. 4.8 ). Specify in Server Address ssh://<ip address>

Fig. 4.8 Connect to Server” option in Nautilus explorer
4.5. Executing the application
You can run the Raspberry PI program using putty (remember that once you have a network connection available in the RPI you can also use putty to connect to it).
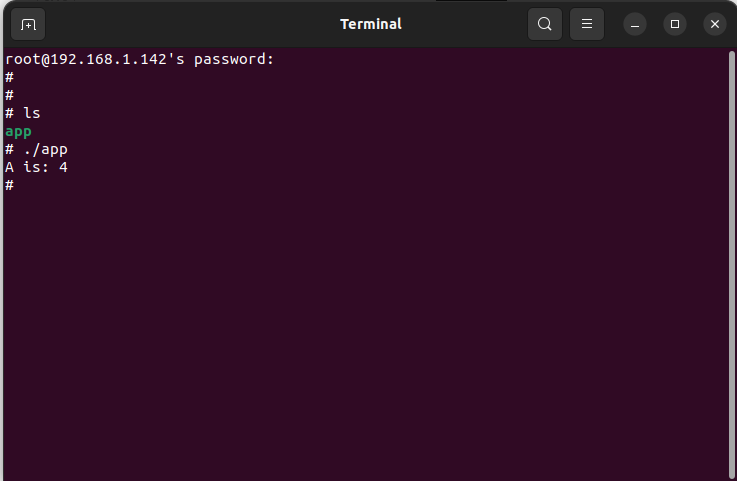
Fig. 4.9 Run test program in Raspberry Pi
Warning
Warning. If you experiment problems using ssh, delete the .ssh folder in your home directory.
4.6. Automatic debugging using gdb and gdbserver
You can directly debug the program running in the RPI using Eclipse. There are two methods to do it: manually and automatically. In the manual method, firstly, you need to copy the executable program to the RPI, change the file permissions to “executable” and execute the program to be debugged using gdbserver utility. Of course, this is a time-consuming process and very inefficient. The alternative solution is to use automatic debugging. In order to debug your applications, we need to define a debug session and configure it. Firstly, Select Run->Debug Configurations and generate a new configuration under C/C++ Remote Application. You need to complete the different tabs available in this window. The first one is the main tab (see Fig. 33). You need to configure here the path to the C/C++ application to be debugged, the project name, the connection with the target (you will need to create a new one using the IP address of your RPI), the remote path where your executable file will be downloaded, and the mode for the debugging (Automatic Remote Debugging Launcher). Secondly, in the argument tab, you can specify the arguments of your executable program. It is very important here that you can also specify the working directory path where the executable will be copied and launched (you need to have rights in this folder).
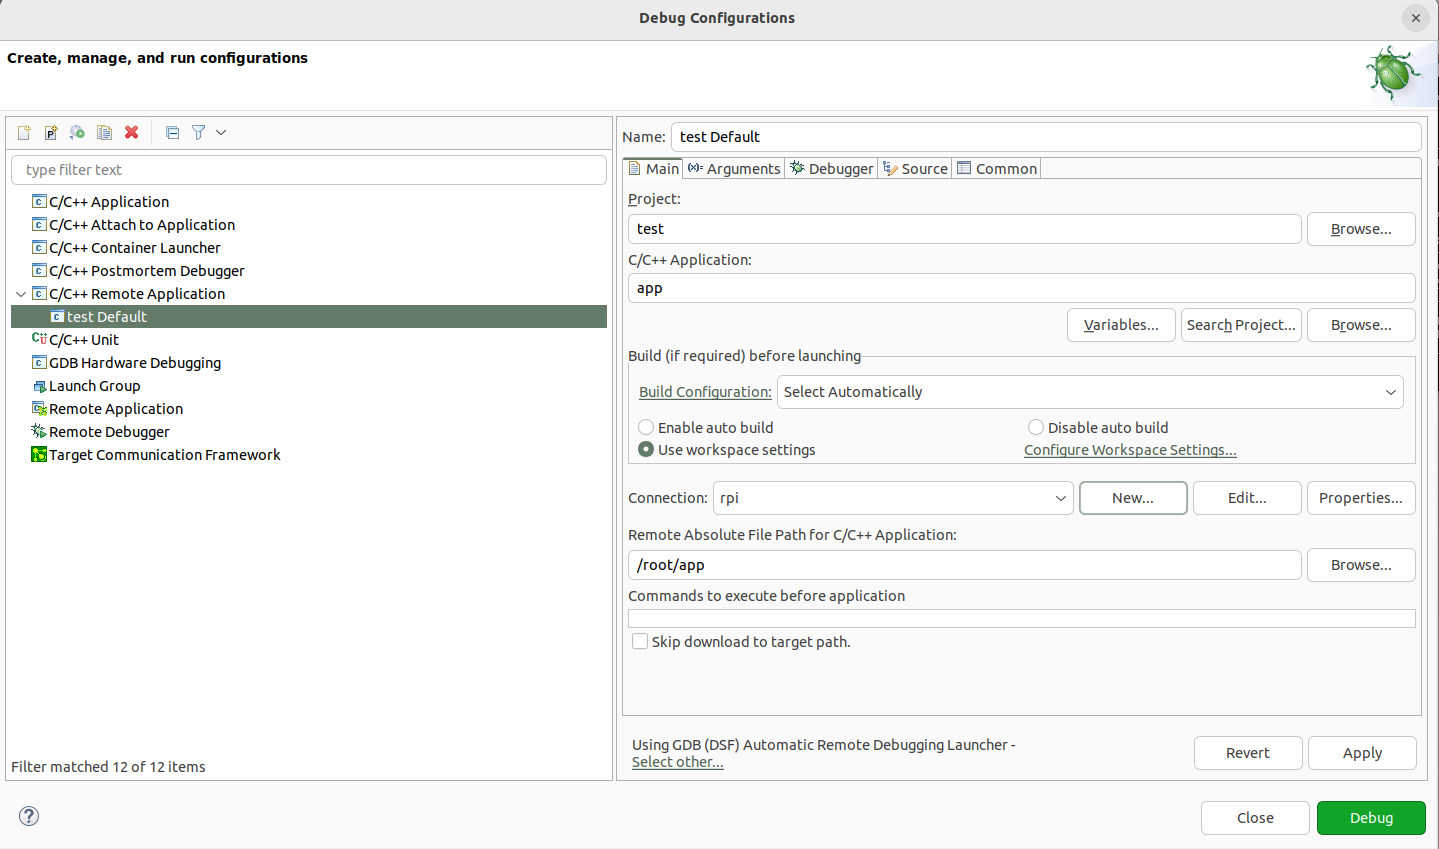
Fig. 4.10 Creating a Debug Configuration
In the debugger window you need to configure the path of your cross gdb application. Remember that we are working with a cross-compiler, cross debugging. Therefore, you need to provide here the correct path of your gdb. The GDB command file (.gdbinit) must be specified, providing a path with an empty file. In the Gdbserver settings tab, you need to provide the path to the gdbserver in the target and the TCP/IP port used (by default 2345).
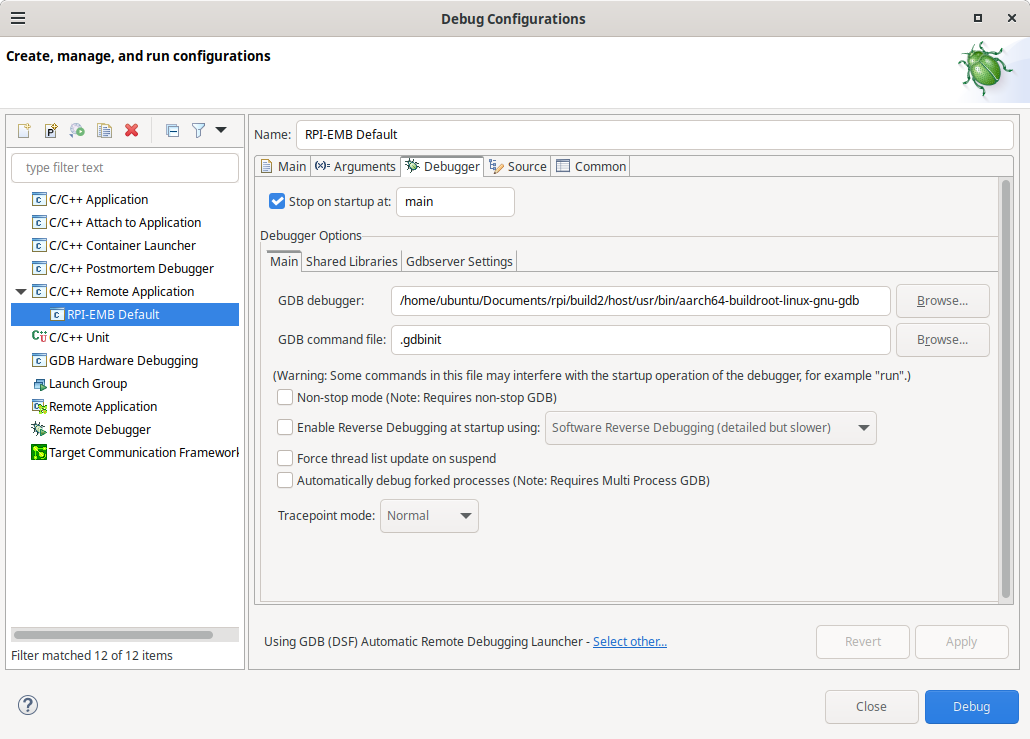
Fig. 4.11 Debug configuration, including the path to locate the cross gdb tool.
Now, press Debug in Eclipse window, and you can debug your application remotely.
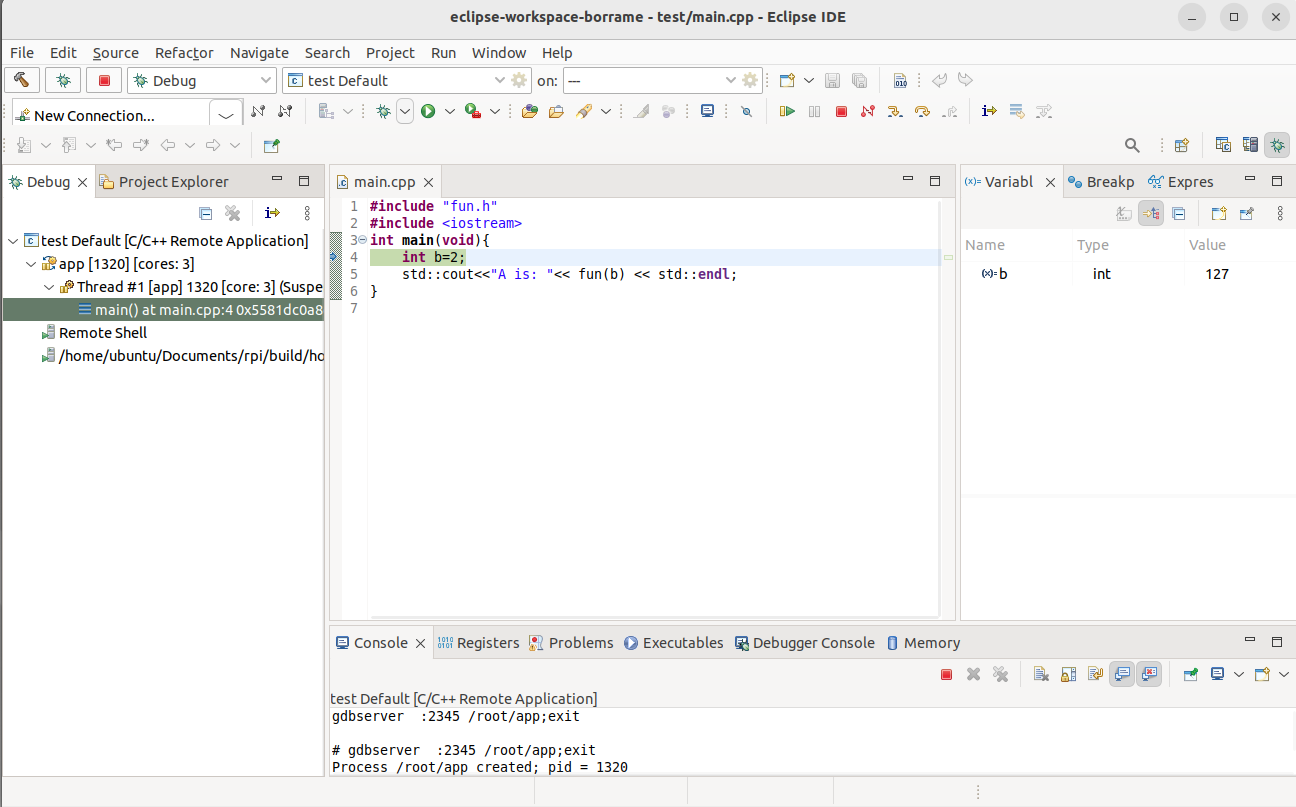
Fig. 4.12 Debugging session on the RPI remotely